Operation: MOSQUITO CONTROL BIKE - Florida RZ500 Project (52X)
Moderator: rztom
-
TwoStrokeNut
- Posts: 585
- Joined: Tue Nov 20, 2012 5:12 pm
- Location: Florida,USA
Re: Operation: MOSQUITO CONTROL BIKE - Florida RZ500 Projec
Thanks Andrew - more details coming...
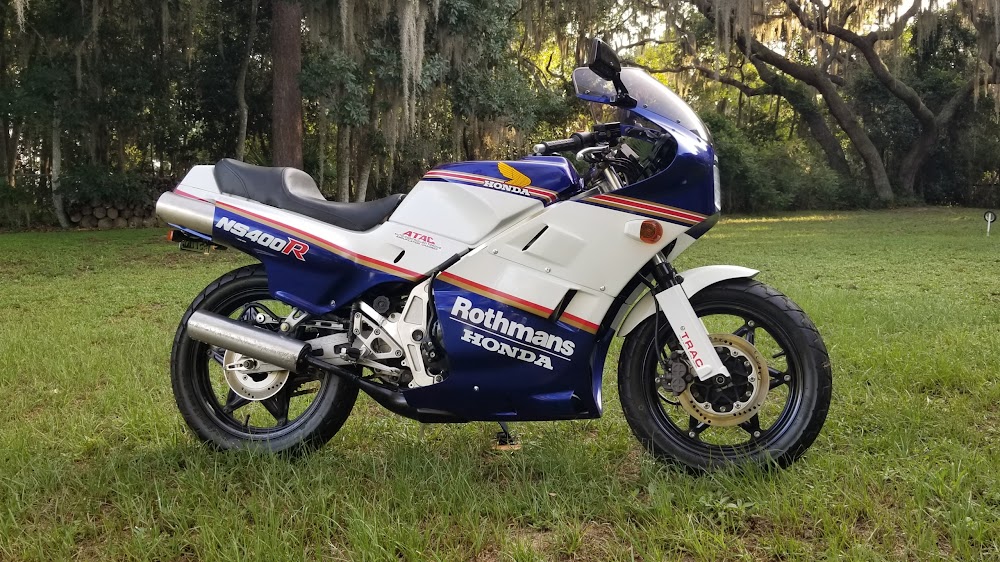
Project bike links: NS400R - TRIPLE THREAT // RZ500 - MOSQUITO CONTROL BIKE // RZ350 - REVIVAL
'72 H1-500/'75 H1-500/'85 RZ350/'85 NS400R/'01 DR650/'07 FJR1300/'18 Tiger 1200
'72 H1-500/'75 H1-500/'85 RZ350/'85 NS400R/'01 DR650/'07 FJR1300/'18 Tiger 1200
-
TwoStrokeNut
- Posts: 585
- Joined: Tue Nov 20, 2012 5:12 pm
- Location: Florida,USA
Re: Operation: MOSQUITO CONTROL BIKE - Florida RZ500 Projec
Service C16 – Chain Guard...
I guess for a more racer look, one of the previous owners probably decided to leave the chain guard off. But being somewhat of a fanatic about routine maintenance, I decided the only way this bike was going to stay clean is to re-install a guard to keep the lube from slinging all over the place.
There are SOME advantages to having a bike pieced together from more modern day iron, and one is a plentiful (and inexpensive!) parts supply on the auction sites. I found this FZR600 guard for US$20, and that included shipping.
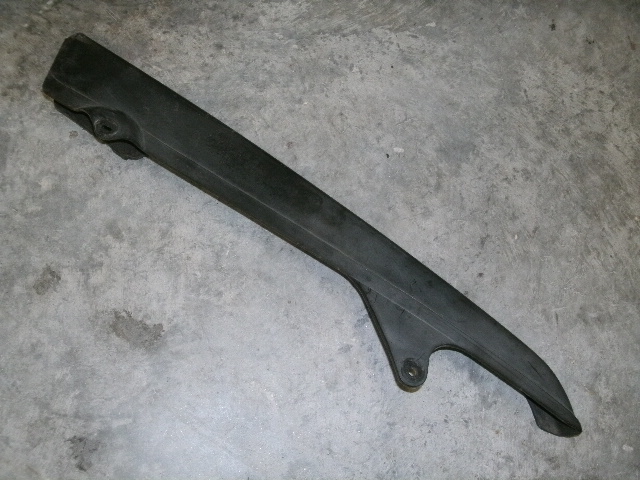
It looked its age (1990’s), but it was free of bad scratches so it turned out to be a great starting point. It really just needed a bit of cleaning and polishing to make it look nearly new. Meguiar’s Mirror Glaze does wonders on plastic - almost too good.

The guard fits pretty well in its new home. There is a bit of rubbing where it contacts the frame downtube, but I don’t think there is really anything I can do about it since the chain itself runs pretty close to the tube as well.

C16 Total Cost: US$20.00 (Chain Guard)
I guess for a more racer look, one of the previous owners probably decided to leave the chain guard off. But being somewhat of a fanatic about routine maintenance, I decided the only way this bike was going to stay clean is to re-install a guard to keep the lube from slinging all over the place.
There are SOME advantages to having a bike pieced together from more modern day iron, and one is a plentiful (and inexpensive!) parts supply on the auction sites. I found this FZR600 guard for US$20, and that included shipping.
It looked its age (1990’s), but it was free of bad scratches so it turned out to be a great starting point. It really just needed a bit of cleaning and polishing to make it look nearly new. Meguiar’s Mirror Glaze does wonders on plastic - almost too good.
The guard fits pretty well in its new home. There is a bit of rubbing where it contacts the frame downtube, but I don’t think there is really anything I can do about it since the chain itself runs pretty close to the tube as well.
C16 Total Cost: US$20.00 (Chain Guard)
Last edited by TwoStrokeNut on Tue Oct 16, 2018 1:22 pm, edited 1 time in total.
Project bike links: NS400R - TRIPLE THREAT // RZ500 - MOSQUITO CONTROL BIKE // RZ350 - REVIVAL
'72 H1-500/'75 H1-500/'85 RZ350/'85 NS400R/'01 DR650/'07 FJR1300/'18 Tiger 1200
'72 H1-500/'75 H1-500/'85 RZ350/'85 NS400R/'01 DR650/'07 FJR1300/'18 Tiger 1200
-
TwoStrokeNut
- Posts: 585
- Joined: Tue Nov 20, 2012 5:12 pm
- Location: Florida,USA
Re: Operation: MOSQUITO CONTROL BIKE - Florida RZ500 Projec
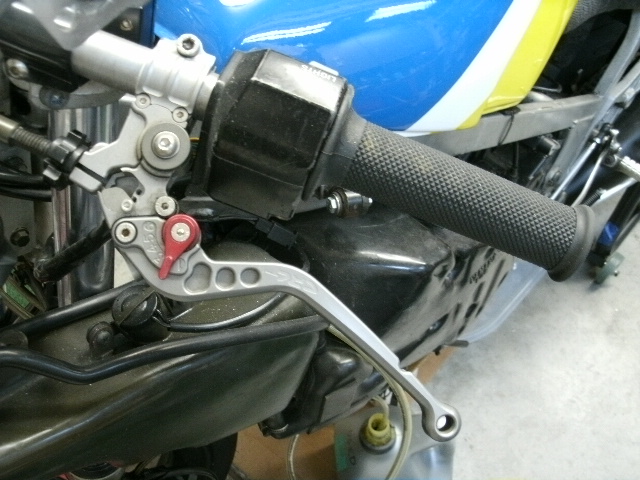
Service C04 - Clutch...
My bike was fitted with a CRG clutch lever, and I must say, I’m quite impressed with this assembly. I had seen them before on bike, but had no idea they are built with bearings in the pivots.
Insert Picture 1
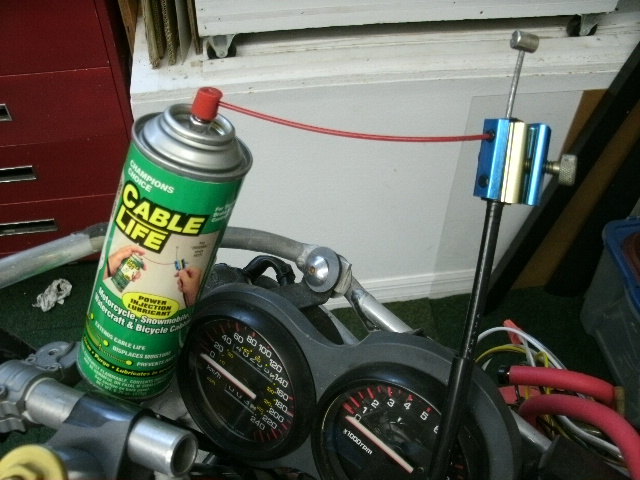
I gave the cable a pressurized shot of lube. These things work pretty good unless you don’t have it tightened up enough, in which case, it drips all over the place. So tighten down good on those thumb screws.
Insert Picture 2
Here’s a better look at the bearings and some of the other bits. Now I know why they cost as much as they do.
Insert Picture 3

Lastly per the service manual, I made a quick adjustment on the clutch push rod.
Insert Picture 4

C04 Total Cost: US$0.00 (Nothing needed, for a change!)
My bike was fitted with a CRG clutch lever, and I must say, I’m quite impressed with this assembly. I had seen them before on bike, but had no idea they are built with bearings in the pivots.
Insert Picture 1
I gave the cable a pressurized shot of lube. These things work pretty good unless you don’t have it tightened up enough, in which case, it drips all over the place. So tighten down good on those thumb screws.
Insert Picture 2
Here’s a better look at the bearings and some of the other bits. Now I know why they cost as much as they do.
Insert Picture 3
Lastly per the service manual, I made a quick adjustment on the clutch push rod.
Insert Picture 4
C04 Total Cost: US$0.00 (Nothing needed, for a change!)
Last edited by TwoStrokeNut on Wed Oct 17, 2018 6:46 am, edited 1 time in total.
Project bike links: NS400R - TRIPLE THREAT // RZ500 - MOSQUITO CONTROL BIKE // RZ350 - REVIVAL
'72 H1-500/'75 H1-500/'85 RZ350/'85 NS400R/'01 DR650/'07 FJR1300/'18 Tiger 1200
'72 H1-500/'75 H1-500/'85 RZ350/'85 NS400R/'01 DR650/'07 FJR1300/'18 Tiger 1200
-
lost1750GTV
- - - - - -

- Posts: 609
- Joined: Thu May 24, 2018 5:22 pm
Re: Operation: MOSQUITO CONTROL BIKE - Florida RZ500 Projec
looking at the start date on this thread makes me feel a little less bad on my virtually no progress on my recent purchase - your quick release for the fuel lines and thoughts on a "service' tank were interesting too, as after a day messing around with free flowing fuel on tank removal while investigating a leaking carb .......at least mine is a 375 cc triple now instead of a very obese 250 twin, but I haven't been looking forward to more of that.
-
TwoStrokeNut
- Posts: 585
- Joined: Tue Nov 20, 2012 5:12 pm
- Location: Florida,USA
Re: Operation: MOSQUITO CONTROL BIKE - Florida RZ500 Projec
I'm glad I can help you out in some way, even if it is just to make you feel better. LOL. Incidentally, I have been revitalized on this project somewhat and I have spent a lot of time cleaning the carbs. More to come shortly on that subject.lost1750GTV wrote:looking at the start date on this thread makes me feel a little less bad on my virtually no progress on my recent purchase - your quick release for the fuel lines and thoughts on a "service' tank were interesting too, as after a day messing around with free flowing fuel on tank removal while investigating a leaking carb .......at least mine is a 375 cc triple now instead of a very obese 250 twin, but I haven't been looking forward to more of that.
Regarding the quick release fuel lines... After watching the old RD500 factory service videos, I realize the recommended way to remove the fuel tank is to detach the fuel lines downstream of the fuel valve and remove the fuel valve and upstream lines along with the tank anytime it is removed. Makes sense. But on my bike, its hard to fish the valve in and out of there next to the frame tube.
Project bike links: NS400R - TRIPLE THREAT // RZ500 - MOSQUITO CONTROL BIKE // RZ350 - REVIVAL
'72 H1-500/'75 H1-500/'85 RZ350/'85 NS400R/'01 DR650/'07 FJR1300/'18 Tiger 1200
'72 H1-500/'75 H1-500/'85 RZ350/'85 NS400R/'01 DR650/'07 FJR1300/'18 Tiger 1200
-
TwoStrokeNut
- Posts: 585
- Joined: Tue Nov 20, 2012 5:12 pm
- Location: Florida,USA
Re: Operation: MOSQUITO CONTROL BIKE - Florida RZ500 Projec
Service C10/C11 – Front Brakes...
The front brake parts are from an FZR600 from what I can tell, so you may not see here what you are generally accustomed to on an RZ500. Besides a fluid flush, I cleaned things up a bit. Here is a BEFORE shot.
Picture 227

Pads need to be replace in the very near future and they are on my shopping list.
Picture 228
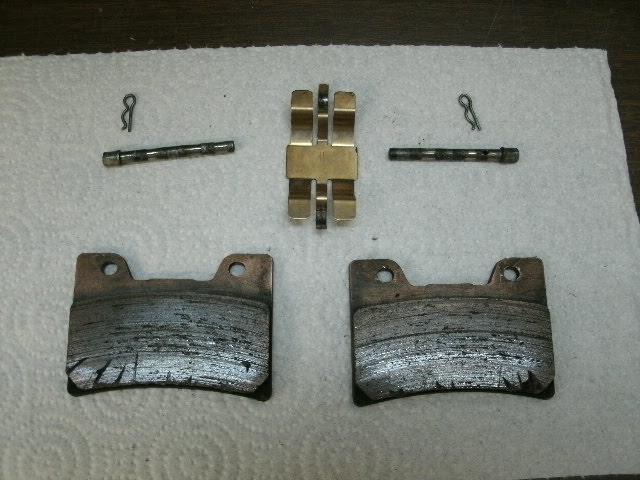
Things cleaned up okay, but remember, this is no show bike.
Picture 229

On to the fluid flushing. I cleaned a bit of nasty stuff out of the reservoir and poured in some fresh fluid before pumping it through the system. No surprises here, and the brakes seemed fine. A test ride someday (soon, I hope!) will tell if I was successful.
Picture 230

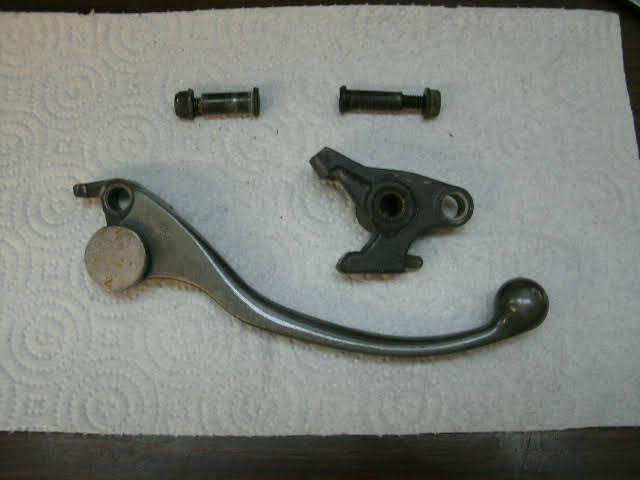
I took the lever assembly apart to clean and lube it. While apart, I carefully straightened the lever itself.
Picture 231

Picture 232
Picture 233

Picture 234

C10/C11 Total Cost: US$5.00 (Brake fluid)
The front brake parts are from an FZR600 from what I can tell, so you may not see here what you are generally accustomed to on an RZ500. Besides a fluid flush, I cleaned things up a bit. Here is a BEFORE shot.
Picture 227
Pads need to be replace in the very near future and they are on my shopping list.
Picture 228
Things cleaned up okay, but remember, this is no show bike.
Picture 229
On to the fluid flushing. I cleaned a bit of nasty stuff out of the reservoir and poured in some fresh fluid before pumping it through the system. No surprises here, and the brakes seemed fine. A test ride someday (soon, I hope!) will tell if I was successful.
Picture 230
I took the lever assembly apart to clean and lube it. While apart, I carefully straightened the lever itself.
Picture 231
Picture 232
Picture 233
Picture 234
C10/C11 Total Cost: US$5.00 (Brake fluid)
Last edited by TwoStrokeNut on Wed Oct 17, 2018 6:46 am, edited 1 time in total.
Project bike links: NS400R - TRIPLE THREAT // RZ500 - MOSQUITO CONTROL BIKE // RZ350 - REVIVAL
'72 H1-500/'75 H1-500/'85 RZ350/'85 NS400R/'01 DR650/'07 FJR1300/'18 Tiger 1200
'72 H1-500/'75 H1-500/'85 RZ350/'85 NS400R/'01 DR650/'07 FJR1300/'18 Tiger 1200
-
silverstrom
- - - - - -
- Posts: 3240
- Joined: Sat Feb 04, 2012 7:36 am
Re: Operation: MOSQUITO CONTROL BIKE - Florida RZ500 Projec
Brilliant play by play here. A nice way for the rest of us to see how it's done. Great job!
-
lost1750GTV
- - - - - -
- Posts: 609
- Joined: Thu May 24, 2018 5:22 pm
Re: Operation: MOSQUITO CONTROL BIKE - Florida RZ500 Projec
"detach the fuel lines downstream" - well that does make sense, but less convenient that a properly placed petcock, ans certainly not something that a primitive like me would have thought of.
I'm looking forward to the "more to come".
I'm looking forward to the "more to come".
-
TwoStrokeNut
- Posts: 585
- Joined: Tue Nov 20, 2012 5:12 pm
- Location: Florida,USA
Re: Operation: MOSQUITO CONTROL BIKE - Florida RZ500 Projec
silverstrom – Thanks. Just documenting what I’m doing, for the benefit of the readers here, AND so I don’t have to remember everything later! LOL
lost1750GTV – Certainly less convenient, that’s for sure. “More” is on the way… forks and carbs are in process.
lost1750GTV – Certainly less convenient, that’s for sure. “More” is on the way… forks and carbs are in process.
Project bike links: NS400R - TRIPLE THREAT // RZ500 - MOSQUITO CONTROL BIKE // RZ350 - REVIVAL
'72 H1-500/'75 H1-500/'85 RZ350/'85 NS400R/'01 DR650/'07 FJR1300/'18 Tiger 1200
'72 H1-500/'75 H1-500/'85 RZ350/'85 NS400R/'01 DR650/'07 FJR1300/'18 Tiger 1200
-
TwoStrokeNut
- Posts: 585
- Joined: Tue Nov 20, 2012 5:12 pm
- Location: Florida,USA
Re: Operation: MOSQUITO CONTROL BIKE - Florida RZ500 Projec
Service C20 – Front Fork...
Unfortunately, I did not get a lot of service history when this bike was purchased. With not knowing when the fork oil was changed last, I figured now was a good time. And not knowing the age of the seals, replacement was probably a wise choice with the bike was apart. Keep in mind these are forks off of an FZR600 so things will look different compared to a stock RZ500.
Picture 235

Picture 236
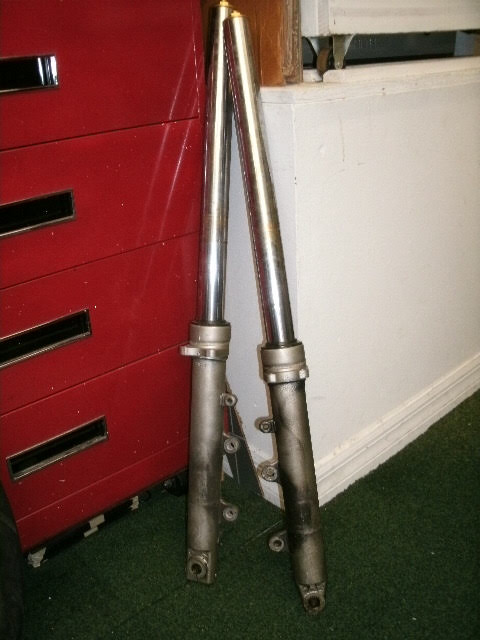
A quick draining to see just how dirty the oil was. It was fairly dark, so a good flushing was in order.
Picture 237

A quick look down past the wipers reassured me seal replacement was a good idea.
Picture 238

I DO have a 20T shop press at my big shop, but I didn’t feel like making the trek out there just to pop this seals out. So I came up with a way to compress the forks between two pillars on the back porch. The forks were completely filled with oil (inexpensive motor oil) to make this a somewhat safe and uneventful endeavor.
Picture 239

Picture 240

The seals popped out without much effort at all. Again, filling the forks completely up with fluid (devoid of any air) makes this a less dramatic process.
Picture 241

Here are the new parts to go back in, along with the washers and retainers. Again, these parts are for an FZR600 fork and LeakProof #42520 kit was used (30x50mm seals).
Picture 242

I like taking internal parts out for thorough cleaning and what I found was rather interesting. Someone had used I section of PVC pipe as spring spacer, but they had turned to semi-rubber after the exposure to oil. Luckily, I had a suitable replacement of aluminum tube on hand to remedy that problem.
Picture 243

Picture 244

Picture 245

Some inexpensive fork oil to fill them back up and the forks were ready to slide back into the trees.
Picture 246

Picture 247

Like most bikes, you need to loosen the top caps before unclamping the tubes in the triple trees. I always write myself a note to tighten them back up once reinstalled
Picture 248

The forks look much better and hopefully a ride soon with prove them to function well too.
C20 Total Cost: US$65.00 (Fork Seals, Fork Oil)
Unfortunately, I did not get a lot of service history when this bike was purchased. With not knowing when the fork oil was changed last, I figured now was a good time. And not knowing the age of the seals, replacement was probably a wise choice with the bike was apart. Keep in mind these are forks off of an FZR600 so things will look different compared to a stock RZ500.
Picture 235
Picture 236
A quick draining to see just how dirty the oil was. It was fairly dark, so a good flushing was in order.
Picture 237
A quick look down past the wipers reassured me seal replacement was a good idea.
Picture 238
I DO have a 20T shop press at my big shop, but I didn’t feel like making the trek out there just to pop this seals out. So I came up with a way to compress the forks between two pillars on the back porch. The forks were completely filled with oil (inexpensive motor oil) to make this a somewhat safe and uneventful endeavor.
Picture 239
Picture 240
The seals popped out without much effort at all. Again, filling the forks completely up with fluid (devoid of any air) makes this a less dramatic process.
Picture 241
Here are the new parts to go back in, along with the washers and retainers. Again, these parts are for an FZR600 fork and LeakProof #42520 kit was used (30x50mm seals).
Picture 242
I like taking internal parts out for thorough cleaning and what I found was rather interesting. Someone had used I section of PVC pipe as spring spacer, but they had turned to semi-rubber after the exposure to oil. Luckily, I had a suitable replacement of aluminum tube on hand to remedy that problem.
Picture 243
Picture 244
Picture 245
Some inexpensive fork oil to fill them back up and the forks were ready to slide back into the trees.
Picture 246
Picture 247
Like most bikes, you need to loosen the top caps before unclamping the tubes in the triple trees. I always write myself a note to tighten them back up once reinstalled
Picture 248
The forks look much better and hopefully a ride soon with prove them to function well too.
C20 Total Cost: US$65.00 (Fork Seals, Fork Oil)
Last edited by TwoStrokeNut on Thu Oct 18, 2018 8:03 am, edited 2 times in total.
Project bike links: NS400R - TRIPLE THREAT // RZ500 - MOSQUITO CONTROL BIKE // RZ350 - REVIVAL
'72 H1-500/'75 H1-500/'85 RZ350/'85 NS400R/'01 DR650/'07 FJR1300/'18 Tiger 1200
'72 H1-500/'75 H1-500/'85 RZ350/'85 NS400R/'01 DR650/'07 FJR1300/'18 Tiger 1200
-
TwoStrokeNut
- Posts: 585
- Joined: Tue Nov 20, 2012 5:12 pm
- Location: Florida,USA
Re: Operation: MOSQUITO CONTROL BIKE - Florida RZ500 Projec
Service C30 - Handlebar (Clip-On) Cleanup...
I know this is just a small detail, but I’m ALL about the details. I don’t like when things look unfinished, and those open holes at the ends of the clip-ons were bugging me.
Picture 249

So I checked my misc part bins for something that fit and came up with these.
Picture 250

A quick shot of paint while some tape kept them from blowing away.
Picture 251

Picture 252

And all finished up!
Picture 253
C30 Total Cost: US$0.00 (Parts and paint from existing stock)
I know this is just a small detail, but I’m ALL about the details. I don’t like when things look unfinished, and those open holes at the ends of the clip-ons were bugging me.
Picture 249
So I checked my misc part bins for something that fit and came up with these.
Picture 250
A quick shot of paint while some tape kept them from blowing away.
Picture 251
Picture 252
And all finished up!
Picture 253
C30 Total Cost: US$0.00 (Parts and paint from existing stock)
Last edited by TwoStrokeNut on Wed Oct 17, 2018 6:45 am, edited 1 time in total.
Project bike links: NS400R - TRIPLE THREAT // RZ500 - MOSQUITO CONTROL BIKE // RZ350 - REVIVAL
'72 H1-500/'75 H1-500/'85 RZ350/'85 NS400R/'01 DR650/'07 FJR1300/'18 Tiger 1200
'72 H1-500/'75 H1-500/'85 RZ350/'85 NS400R/'01 DR650/'07 FJR1300/'18 Tiger 1200
-
TwoStrokeNut
- Posts: 585
- Joined: Tue Nov 20, 2012 5:12 pm
- Location: Florida,USA
Re: Operation: MOSQUITO CONTROL BIKE - Florida RZ500 Projec
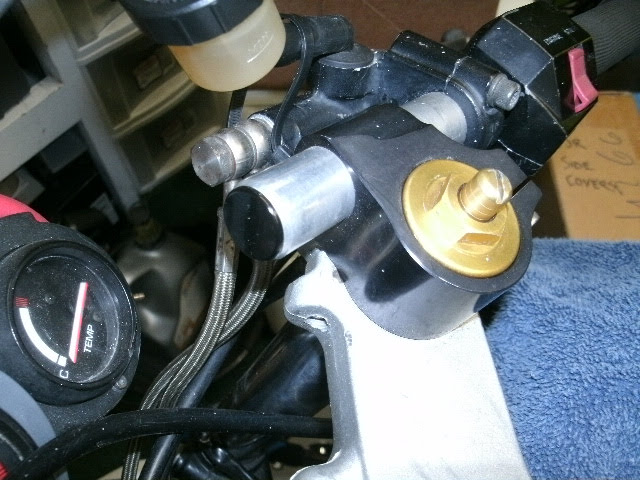
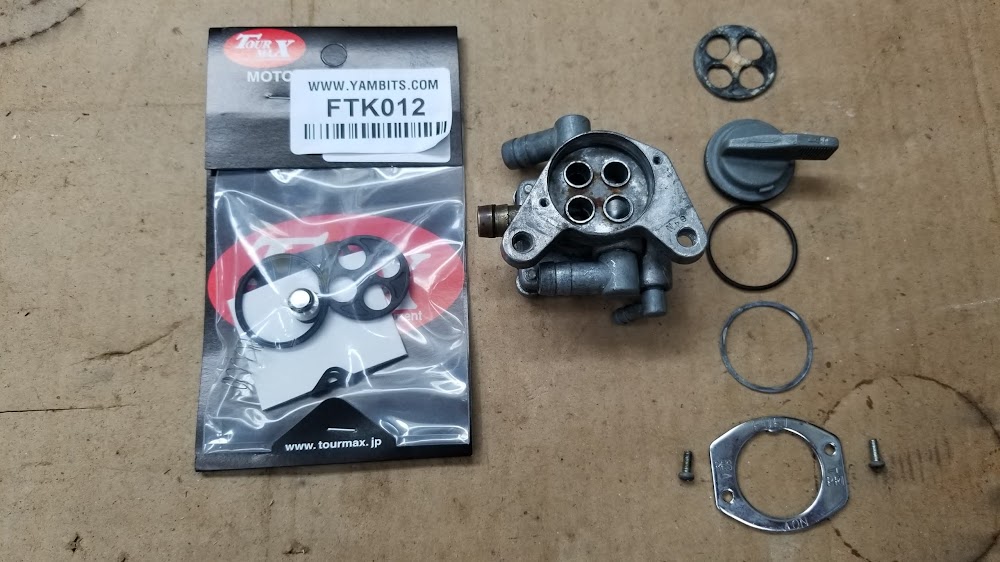
Service M12 - Fuel valve repair...
This bike has sat a pretty long time and I figured I needed a little incentive to get working on it again. And what better incentive than to hear the 4-cylinder 2-stroke sing!! So I dumped a little fuel in it and before I could even kick it over, there was fuel dribbling out of the fuel valve around the selector knob. So it was time for a rebuild.
Picture 254

I researched for kits in the US with similar internal parts with no luck. So I turned to YamaBits (one of two sources overseas that provide kits). Here’s the kit along with the knob-side parts removed.
Picture 255
Here is the diaphragm side disassembled.
Picture 256

My ultrasonic cleaner was filled up and ready to go so I dunked the valve body and various parts in it.
Picture 257

Once it was all back together, I did a quick check to see if the different knob positions did what they are supposed to do. Don’t apply too much vacuum – that diaphragm wasn’t designed to take it!
Picture 258

Here is a shot looking under the kit label in case it may help with someone’s sourcing research.
Picture 259

M12 Total Cost: US$28.00 (Fuel Valve Kit)
This bike has sat a pretty long time and I figured I needed a little incentive to get working on it again. And what better incentive than to hear the 4-cylinder 2-stroke sing!! So I dumped a little fuel in it and before I could even kick it over, there was fuel dribbling out of the fuel valve around the selector knob. So it was time for a rebuild.
Picture 254
I researched for kits in the US with similar internal parts with no luck. So I turned to YamaBits (one of two sources overseas that provide kits). Here’s the kit along with the knob-side parts removed.
Picture 255
Here is the diaphragm side disassembled.
Picture 256
My ultrasonic cleaner was filled up and ready to go so I dunked the valve body and various parts in it.
Picture 257
Once it was all back together, I did a quick check to see if the different knob positions did what they are supposed to do. Don’t apply too much vacuum – that diaphragm wasn’t designed to take it!
Picture 258
Here is a shot looking under the kit label in case it may help with someone’s sourcing research.
Picture 259
M12 Total Cost: US$28.00 (Fuel Valve Kit)
Project bike links: NS400R - TRIPLE THREAT // RZ500 - MOSQUITO CONTROL BIKE // RZ350 - REVIVAL
'72 H1-500/'75 H1-500/'85 RZ350/'85 NS400R/'01 DR650/'07 FJR1300/'18 Tiger 1200
'72 H1-500/'75 H1-500/'85 RZ350/'85 NS400R/'01 DR650/'07 FJR1300/'18 Tiger 1200
-
TwoStrokeNut
- Posts: 585
- Joined: Tue Nov 20, 2012 5:12 pm
- Location: Florida,USA
Re: Operation: MOSQUITO CONTROL BIKE - Florida RZ500 Projec
Service M03 - Carb Cleaning... (Part 1 of 8 )
Summers in Florida, USA are usually my downtime for the bikes due to the heat and humidity. It’s a time to get caught up on maintenance and work on any long-term repairs or upgrades. This summer I took on the rebuilding of the RZ500 carbs. The previous owner confessed to not cleaning the carbs very well and the lack of low-end power on my original test ride suggested also that something was amiss. So it’s time to take a look inside and give them a good cleaning.
This is what I started with. Not terribly dirty. All parts seemed to be there, minus the heat shields.
Picture 260

I figured this was going to be a fairly lengthy process, so I found some plugs that fit in the manifolds perfectly to seal it all up.
Picture 261

Here is the left pair.
Picture 262

Picture 263
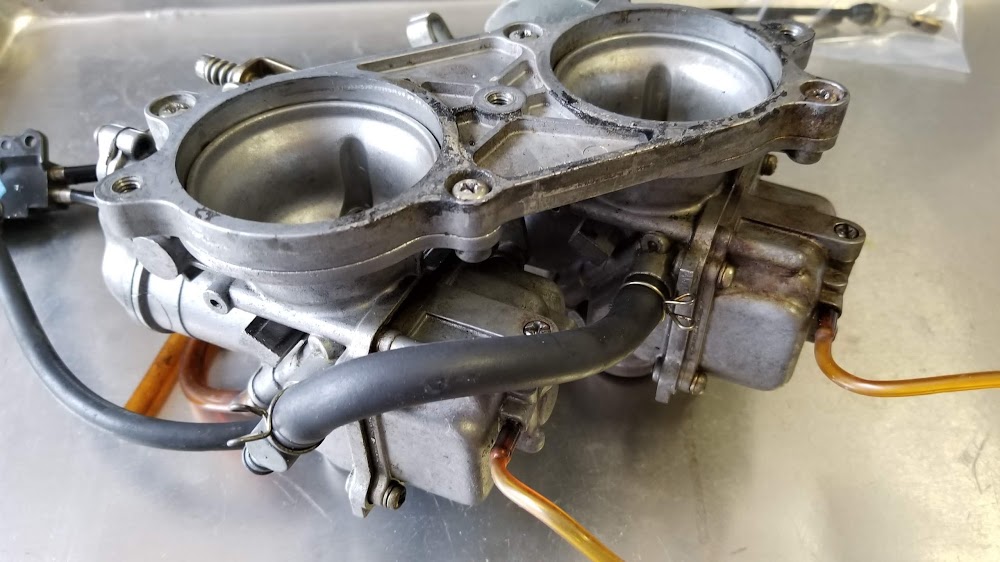
And the right pair.
Picture 264

Picture 265

And lastly, the fuel valve and hoses.
Picture 266

Disassembly and cleaning were next and the results are always satisfactory with the heated ultrasonic cleaner. I use Simple Green Extreme cleaner in a 50/50 mix with distilled water. It was designed to clean aluminum aircraft parts and I’ve never had a problem soaking parts in it as long as I want.
Picture 267

Picture 268

Picture 269

Summers in Florida, USA are usually my downtime for the bikes due to the heat and humidity. It’s a time to get caught up on maintenance and work on any long-term repairs or upgrades. This summer I took on the rebuilding of the RZ500 carbs. The previous owner confessed to not cleaning the carbs very well and the lack of low-end power on my original test ride suggested also that something was amiss. So it’s time to take a look inside and give them a good cleaning.
This is what I started with. Not terribly dirty. All parts seemed to be there, minus the heat shields.
Picture 260
I figured this was going to be a fairly lengthy process, so I found some plugs that fit in the manifolds perfectly to seal it all up.
Picture 261
Here is the left pair.
Picture 262
Picture 263
And the right pair.
Picture 264
Picture 265
And lastly, the fuel valve and hoses.
Picture 266
Disassembly and cleaning were next and the results are always satisfactory with the heated ultrasonic cleaner. I use Simple Green Extreme cleaner in a 50/50 mix with distilled water. It was designed to clean aluminum aircraft parts and I’ve never had a problem soaking parts in it as long as I want.
Picture 267
Picture 268
Picture 269
Last edited by TwoStrokeNut on Thu Dec 20, 2018 8:15 pm, edited 2 times in total.
Project bike links: NS400R - TRIPLE THREAT // RZ500 - MOSQUITO CONTROL BIKE // RZ350 - REVIVAL
'72 H1-500/'75 H1-500/'85 RZ350/'85 NS400R/'01 DR650/'07 FJR1300/'18 Tiger 1200
'72 H1-500/'75 H1-500/'85 RZ350/'85 NS400R/'01 DR650/'07 FJR1300/'18 Tiger 1200
-
TwoStrokeNut
- Posts: 585
- Joined: Tue Nov 20, 2012 5:12 pm
- Location: Florida,USA
Re: Operation: MOSQUITO CONTROL BIKE - Florida RZ500 Projec
Service M03 - Carb Cleaning... (Part 2 of 8 )
I bought some of the cheapie carb repair kits on ebay before reading mixed reviews about their performance, and decided I would just use the gaskets and bowl screws from them. At about $10/carb, that’s still not a bad price for the 4 parts used.
Picture 270

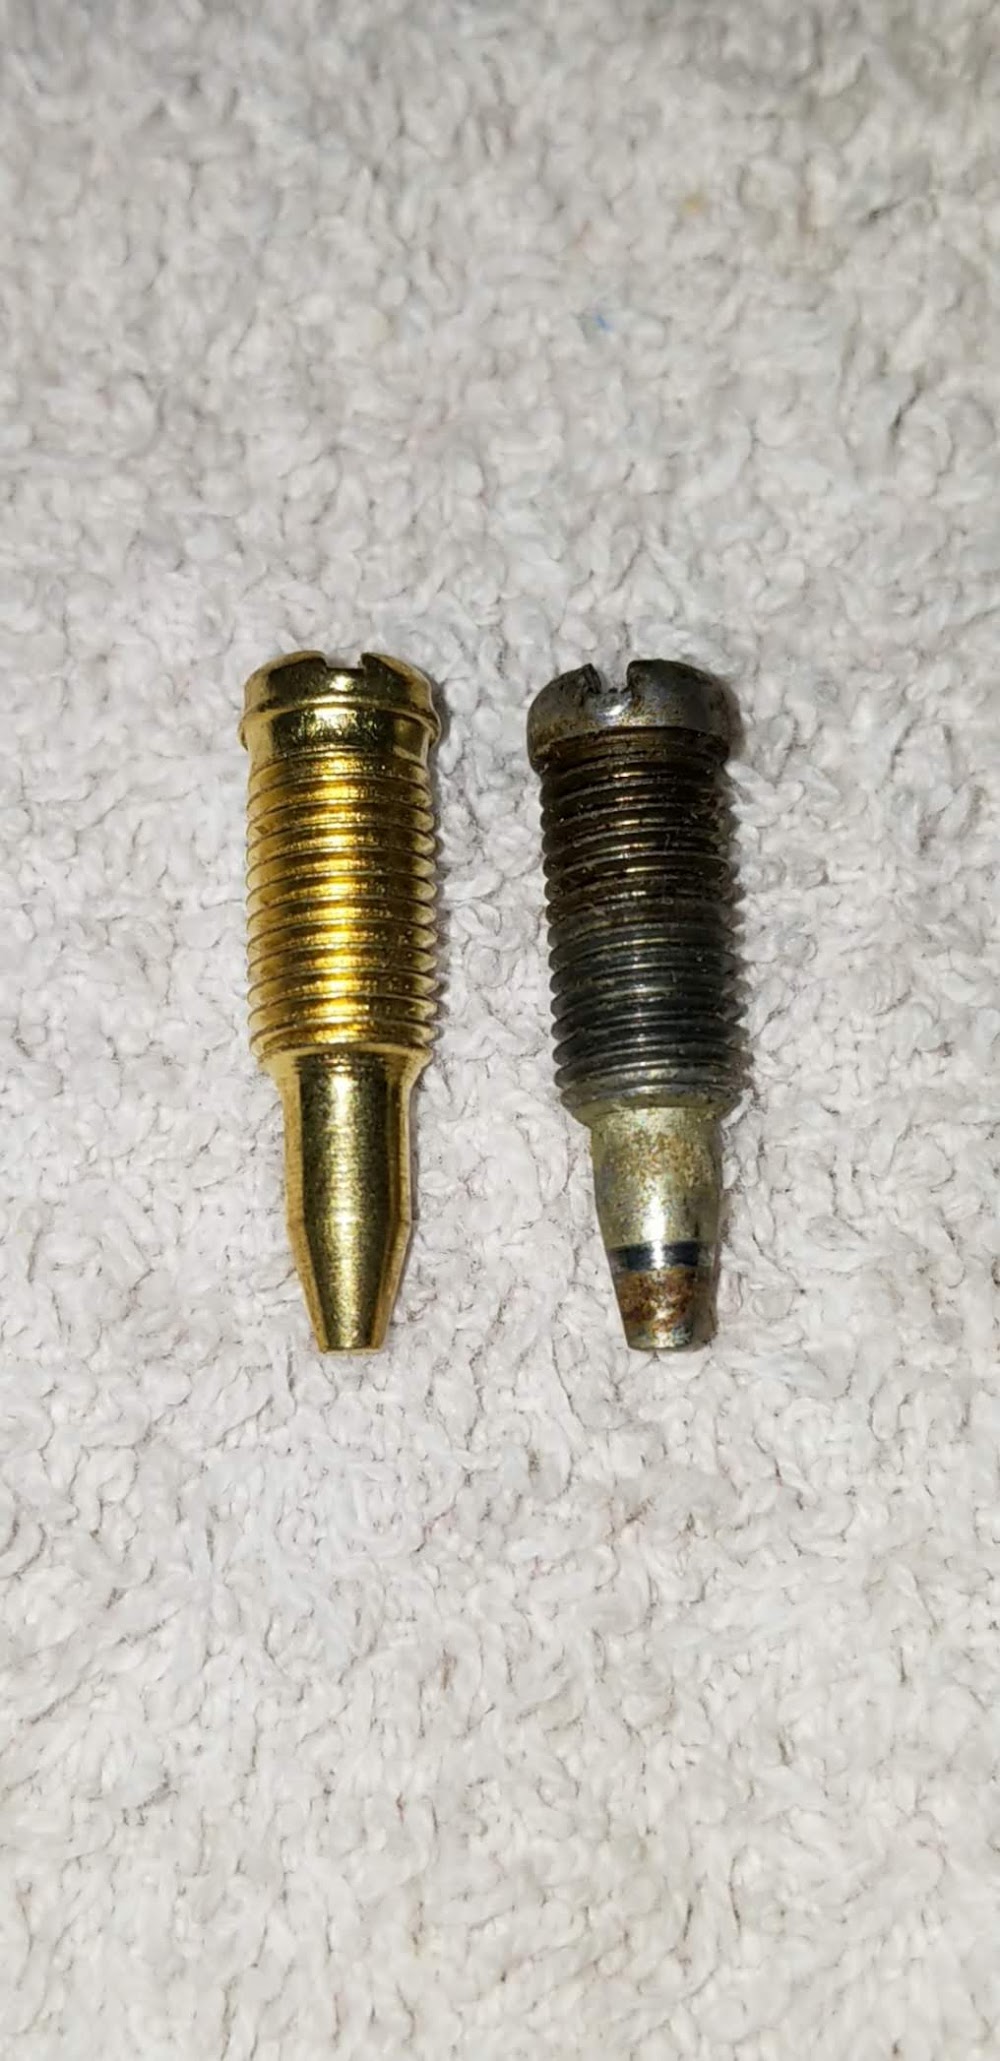
The following set of pictures is a comparison of the original OEM vs the rebuild kit parts for those that are interested. I didn’t plan to use any of them except the bowl drain screw, but the several of the parts looked to be suitable replacements. Particularly noteworthy was the pilot jet with its lack of chamfers on the cross holes – that has to inhibit performance!
Picture 271
Picture 272

Picture 273

Picture 274

Picture 275

I bought some of the cheapie carb repair kits on ebay before reading mixed reviews about their performance, and decided I would just use the gaskets and bowl screws from them. At about $10/carb, that’s still not a bad price for the 4 parts used.
Picture 270
The following set of pictures is a comparison of the original OEM vs the rebuild kit parts for those that are interested. I didn’t plan to use any of them except the bowl drain screw, but the several of the parts looked to be suitable replacements. Particularly noteworthy was the pilot jet with its lack of chamfers on the cross holes – that has to inhibit performance!
Picture 271
Picture 272
Picture 273
Picture 274
Picture 275
Last edited by TwoStrokeNut on Thu Dec 20, 2018 8:16 pm, edited 2 times in total.
Project bike links: NS400R - TRIPLE THREAT // RZ500 - MOSQUITO CONTROL BIKE // RZ350 - REVIVAL
'72 H1-500/'75 H1-500/'85 RZ350/'85 NS400R/'01 DR650/'07 FJR1300/'18 Tiger 1200
'72 H1-500/'75 H1-500/'85 RZ350/'85 NS400R/'01 DR650/'07 FJR1300/'18 Tiger 1200
-
TwoStrokeNut
- Posts: 585
- Joined: Tue Nov 20, 2012 5:12 pm
- Location: Florida,USA
Re: Operation: MOSQUITO CONTROL BIKE - Florida RZ500 Projec
Service M03 - Carb Cleaning... (Part 3 of 8 )
After all parts were clean, it was on to re-assembly. I substituted SS socket head cap screws in place of the Phillips screws wherever possible.
Picture 276

Picture 277
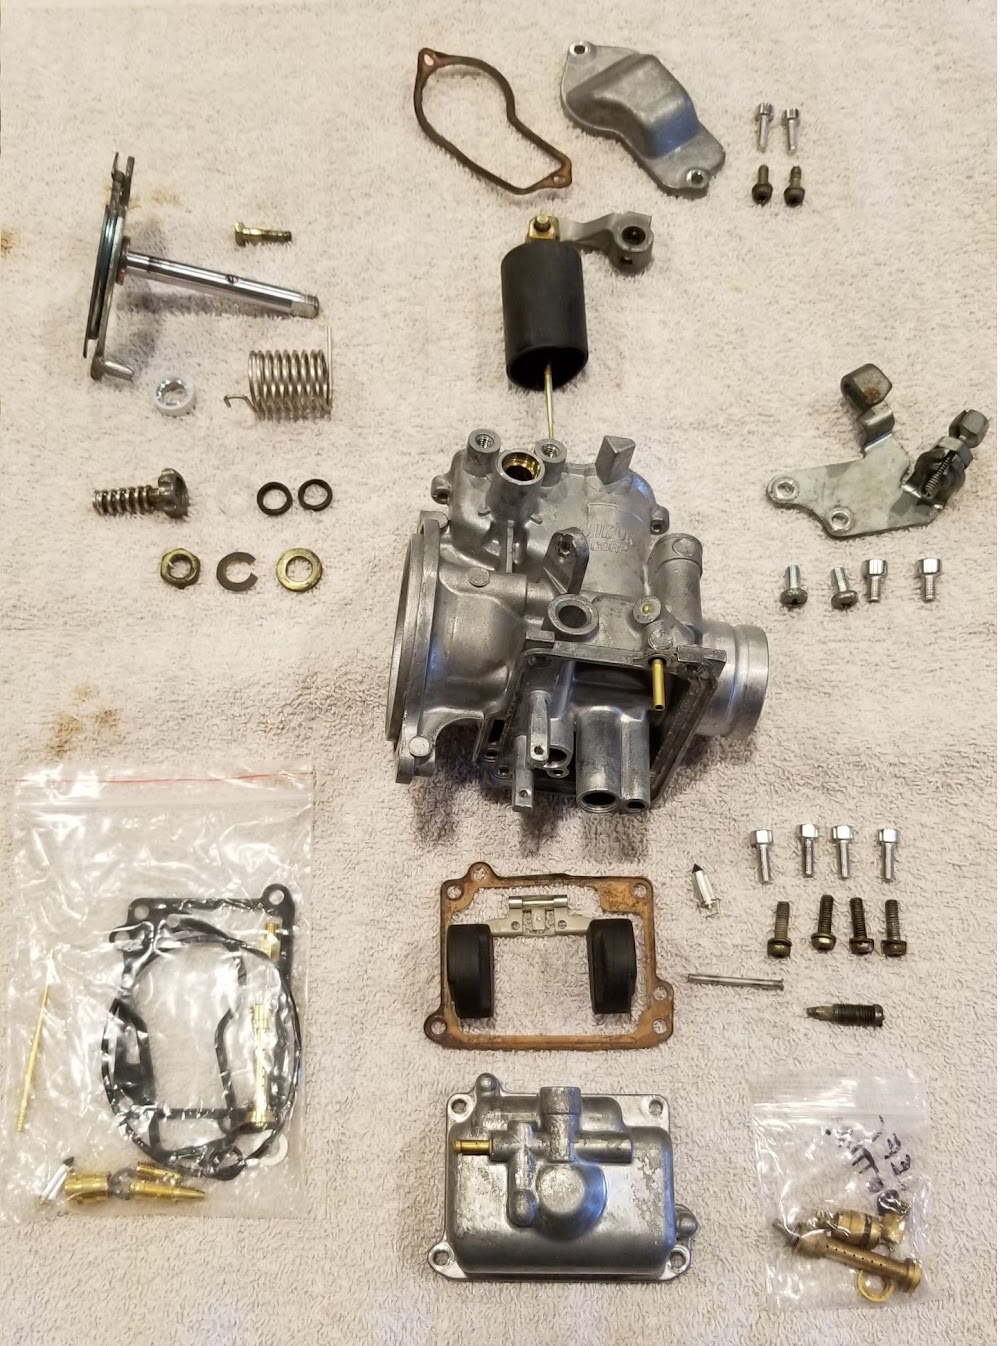
I tried to use the float needle and seat from the cheap kit and besides finding out there were 3 of the 4 retainer wires missing from the needles valves (they are really tiny!), they didn’t come with the proper O-ring (or maybe the groove wasn’t deep enough). Even with liberal lube and care during installation, I still managed to extrude the O-rings. I then purchased some Keyster valve kits (48-1430) which cost another $10/carb, but fit nicely.
Picture 278

Picture 279

Float height was set at 24mm.
Picture 280

Picture 281

And all internals were noted on the carb. (I never know when a long-term interruption will plague me, so it’s good for me to take notes to easily pick project back up later)
Picture 282

After all parts were clean, it was on to re-assembly. I substituted SS socket head cap screws in place of the Phillips screws wherever possible.
Picture 276
Picture 277
I tried to use the float needle and seat from the cheap kit and besides finding out there were 3 of the 4 retainer wires missing from the needles valves (they are really tiny!), they didn’t come with the proper O-ring (or maybe the groove wasn’t deep enough). Even with liberal lube and care during installation, I still managed to extrude the O-rings. I then purchased some Keyster valve kits (48-1430) which cost another $10/carb, but fit nicely.
Picture 278
Picture 279
Float height was set at 24mm.
Picture 280
Picture 281
And all internals were noted on the carb. (I never know when a long-term interruption will plague me, so it’s good for me to take notes to easily pick project back up later)
Picture 282
Last edited by TwoStrokeNut on Thu Dec 20, 2018 8:16 pm, edited 2 times in total.
Project bike links: NS400R - TRIPLE THREAT // RZ500 - MOSQUITO CONTROL BIKE // RZ350 - REVIVAL
'72 H1-500/'75 H1-500/'85 RZ350/'85 NS400R/'01 DR650/'07 FJR1300/'18 Tiger 1200
'72 H1-500/'75 H1-500/'85 RZ350/'85 NS400R/'01 DR650/'07 FJR1300/'18 Tiger 1200