
That 'leak' is probably from chain lube or it could be from the countershaft sprocket leaking. It can be replaced from the outside.
Steve Loomis. Have you ever seen a crank become missaligned with a bit of rattle gun? I have used them several times. Seemingly without trouble.
RD350B sitting for 20 years precautions before starting?
Moderator: rztom
Re: RD350B sitting for 20 years precautions before starting?
RZ350K and RD350B, original owner
Both running!!
CR500R ... waking up
Motors by: Roger @ WickedATV
My RD-350 rebuild page updated 6/10/12
Both running!!
CR500R ... waking up
Motors by: Roger @ WickedATV
My RD-350 rebuild page updated 6/10/12
-
steveloomis
- -----

- Posts: 1507
- Joined: Tue Dec 06, 2011 11:18 am
- Location: Oklahoma USA
Re: RD350B sitting for 20 years precautions before starting?
I'm only passing on advice given to me. If it is possible, I sure don't want to damage a crank. My cranks are welded pins but I still do not use a "rattle gun"...
So how do you know that the fingers break so easily? Lol jk!
So how do you know that the fingers break so easily? Lol jk!
'81 RD350LC hybrid w/84 RZ engine. Zeel, Old style Toomeys, Yboot and filter 420 main 22.5 pilot, Air screw 2.5 turns out, DJ needle 2nd from top, Canadian VM26 carbs.
'85 KR/RZ US. Tank is seeping causing a blister in paint.....
'85 KR/RZ US. Tank is seeping causing a blister in paint.....
-
pushstartrearset

- -----
- Posts: 1339
- Joined: Thu Mar 17, 2011 4:20 pm
- Location: Vancouver, WA
Re: RD350B sitting for 20 years precautions before starting?
Speaking of this area: take a good look at the countershaft collar. I had replaced numerous seals to fix the "radial" leak to no avail. It was finally fixed w/ a replacement collar (spare) that had less wear. the seal slowly wears the collar and then no seal replacement will stop the leak. I also was able to buy a NEW N.O.S. collar from NorthWest Vintage Cycle parts. So it is not just the seal that can cause the leak but the collar itself that sits inside the seal lips! Mine was shiny, but w/ no real ridges, so i thought it was ok. Not so. You are better served to buy a N.O.S. one rather than chance it and have to do the job twice!heyjoe wrote:That 'leak' is probably from chain lube or it could be from the countershaft sprocket leaking. It can be replaced from the outside.
Want to stop leaks on your garage floor? I think Economy Cycle has modified a pingel petcock for the RD350. I ahve a banshee pingel on my RD400 and the floor stays clean. OFF equals ZERO leaks out the petcock AND high flow(petcock ON) both very good attributes. Make sure float levels are good and carb has new gaskets/needle valves seats (viton!!).
1984 RZ350L (U.S.) Old Toomeys, oil injected!, Y-boot K&N. loctite throttle cable holder on left carb!! , 410 mains, Dynojet needles 2.0 clip, #20 pilot @ 1.5 turn a.s., 240/512 p.v.
-
patastinky

- Posts: 52
- Joined: Fri May 16, 2014 1:40 am
Re: RD350B sitting for 20 years precautions before starting?
I'm going to try my luck with the original petcock. I was able to remove all the gunk from within it. I already ordered the seals for it & external fuel filter.pushstartrearset wrote:Speaking of this area: take a good look at the countershaft collar. I had replaced numerous seals to fix the "radial" leak to no avail. It was finally fixed w/ a replacement collar (spare) that had less wear. the seal slowly wears the collar and then no seal replacement will stop the leak. I also was able to buy a NEW N.O.S. collar from NorthWest Vintage Cycle parts. So it is not just the seal that can cause the leak but the collar itself that sits inside the seal lips! Mine was shiny, but w/ no real ridges, so i thought it was ok. Not so. You are better served to buy a N.O.S. one rather than chance it and have to do the job twice!heyjoe wrote:That 'leak' is probably from chain lube or it could be from the countershaft sprocket leaking. It can be replaced from the outside.
Want to stop leaks on your garage floor? I think Economy Cycle has modified a pingel petcock for the RD350. I ahve a banshee pingel on my RD400 and the floor stays clean. OFF equals ZERO leaks out the petcock AND high flow(petcock ON) both very good attributes. Make sure float levels are good and carb has new gaskets/needle valves seats (viton!!).
I'm currently still working on removing the rust from the bottom of the gas tank. Its currently raining here in NJ so I can't go outside to the shack to check it. Stay tuned for an update on that tomorrow night.
This weekend i'm going to take a look at the carbs for sure. I know that typically when removing any part that has a seal (especially given the age of them and the bike) to have new seals at the ready. I want to peak inside the carbs to see how they've held up all these years. Do you think i could get away with disassembling them and reassembling them, that is if everything looks good inside and i decide to start it to see if she'll even fire?
-
steveloomis
- -----
- Posts: 1507
- Joined: Tue Dec 06, 2011 11:18 am
- Location: Oklahoma USA
Re: RD350B sitting for 20 years precautions before starting?
Provided your carbs are clean, really clean, all passages, emulsion tube (I told you about that already). Float level is pretty critical. I don't off hand know the setting for your carbs, but the RZ's are 21mm from the carb body float bowl surface without the gasket.
If you want to fire it up, try it, just don't expect too much and don't run much as you can have air leaks. Nice to hear it fire up, gives a little incentive to get it all done right. Let us know how it goes....
Steve
If you want to fire it up, try it, just don't expect too much and don't run much as you can have air leaks. Nice to hear it fire up, gives a little incentive to get it all done right. Let us know how it goes....
Steve
'81 RD350LC hybrid w/84 RZ engine. Zeel, Old style Toomeys, Yboot and filter 420 main 22.5 pilot, Air screw 2.5 turns out, DJ needle 2nd from top, Canadian VM26 carbs.
'85 KR/RZ US. Tank is seeping causing a blister in paint.....
'85 KR/RZ US. Tank is seeping causing a blister in paint.....

Re: RD350B sitting for 20 years precautions before starting?
if you do run it, make sure you have a way of shutting it off it it pulls too much air in a leak. ie a rag, and the chain fitted so you can use the brakes after putting it in gear. Ive had runaways on old bikes with suspect seals in the intake and the key and even plug cap wont stop them as they diesel at full pelt til the fuel and air runs out. not at all fun...
80 XT500 Supermoto!
81 RD350LC Resto
82 RD421LC Hybrid
82 RD350LC decapitation project
82 RD250LC JDM '251LC' YPVS
83 RZ350 Resto
84 RZ500 Resto
85 RZ350 F1 Resto
86 RZ350 F2 Resto
86 RZ350 F2 Hybrid
Like Watches? www.PloProf.com & www.DeskDivers.com
81 RD350LC Resto
82 RD421LC Hybrid
82 RD350LC decapitation project
82 RD250LC JDM '251LC' YPVS
83 RZ350 Resto
84 RZ500 Resto
85 RZ350 F1 Resto
86 RZ350 F2 Resto
86 RZ350 F2 Hybrid
Like Watches? www.PloProf.com & www.DeskDivers.com
-
patastinky
- Posts: 52
- Joined: Fri May 16, 2014 1:40 am
RD350B sitting for 20 years precautions before starting?
O.K. so I went back to the beginning of my thread and re-read everyone's posts.  I truly want to thank everyone who has commented and continue to do so.
  Your insight, experience and advice have helped me get this far. I do not wish to sell the bike or rush the project; this bike is my first bike. I want it to be safe and one that will last me a long time. I was hesitant to open up the motor, because I've never done that before.. I guess as i'm getting older I don't rush into things as I used to in my 20s. At any rate starting her up goes against better judgment and against a lot of the advise I've gotten.
The bike has been sitting since 1982 (30 years not 20 as I mistakenly wrote when starting the thread ). I'll have to open up the engine eventually to replace seals and clean her up. Starting her up could potentially cause damage which will end up costing me TIME & $$$.
This weekend, in my spare time, I am going to make room in the shed for the motor dissemblance. I have some mechanical experience. In my early 20s I was swaping SOHC D-series & F-series engines (81-97 Civics & 90-97 Accords) for DOHC VTEC engines in my backyard. The process at times required automatic transmission vehicles to be converted to manual transmission. Also some ECU flashing and rewiring had to be done; minor rewiring of the engine harness as well. However this will be the first time I've ever opened up a engine. I'm kind of looking forward to it. Luckily I have the original service manual and you guys to guide me through the process.
So with that said, for the time being, expect to see less updates from me until the shed is cleaned out and prepped for engine disassemble.
The bike has been sitting since 1982 (30 years not 20 as I mistakenly wrote when starting the thread
This weekend, in my spare time, I am going to make room in the shed for the motor dissemblance. I have some mechanical experience. In my early 20s I was swaping SOHC D-series & F-series engines (81-97 Civics & 90-97 Accords) for DOHC VTEC engines in my backyard. The process at times required automatic transmission vehicles to be converted to manual transmission. Also some ECU flashing and rewiring had to be done; minor rewiring of the engine harness as well. However this will be the first time I've ever opened up a engine. I'm kind of looking forward to it. Luckily I have the original service manual and you guys to guide me through the process.
So with that said, for the time being, expect to see less updates from me until the shed is cleaned out and prepped for engine disassemble.
Last edited by patastinky on Wed Jun 04, 2014 6:34 pm, edited 3 times in total.
-
pushstartrearset
- -----
- Posts: 1339
- Joined: Thu Mar 17, 2011 4:20 pm
- Location: Vancouver, WA
Re: RD350B sitting for 20 years precautions before starting?
it will be easy if you catalogue. 2 large gallon bags. 1 bag for top case bolts. 1 bag for bottom nuts / bolts. The Top numbers "T". Bottom numbers "B"...followed by 1,2,3, etc. Tap Plastics sells these tiny bags that'll I'll label T1, T2, B1, B2 (EDIT: label them according to the bolt numbers in teh FACTORY manual..so if that bolt corresponds w/ T12 in the factory picture...label it T12 and not your own picked number to avoid confusion!) and store them in their respective bags. You'll want a piece of wood to separate the cases w/o damage (tap w/ thor hammer or dead blow front to back, slowly..comes a little at a time). Be sure to follow the manual procedure for reassembly (inch-lb torque wrench). This is important. As you have different length bolts and putting in the wrong length bolts and tightening / torqueing out of sequence/order can strip a case and catalogueing will eliminate errors of bolt placement. Things to look for. The ball bearing likes to roll out and hide when you remove the clutch push rod <---keep an eye out for it and bag it.. just tipping the engine adn the ball bearing will fall out.
First thing remove ignition rotor w/ the upper case mount bolt (the big one of the 3 i believe), bike in gear hold both brakes, pop loose.
2nd thing is to get the countershaft sprocket off. If motor still in bike, put in gear, hold both brakes...preferable a breaker bar w/ the right socket and pop loose (while sitting on bike). REmove sprocket, set chain aside on swingarm.
Drain tranny oil first!! 3rd remove right side cover...place a thick shop cloth between clutch basket gear and primary (crank). remove primary nut. To remove clutch nut, i use the motion pro clutch basket holding too. looks like a weird set of vice grips. AT this point w/ the basket removed EDIT: there is a triangular brace behind where basket sat held by 3 large inset phillips heads screws-->REMOVE!! as it will not allow you to separate case halves w/i in place!! (remember the basket washer and the clutch plate / steel plate order...if stock it will have the rubber rings...non-stock replacements discards the rubber rings.. there is the shift shaft w/ a small HAT that can easily be lost that sits atop the shifter arm extension....<be careful and bag and tag and remember this hat to be put back or you'll have problem shifting when you slap it back together. I have never had to remove the shift drum, or detent at bottom of case so i leave those alone unless otherwise. NOTE: when you get to the gears w/ their wavy washers spacers and stuff, put them in plastic bags in exploded order and label. This all makes reassembly mostly painless and quick and easy. I do this every time w/ every build.... no lost nuts and bolts and no guessing.
someone else can chime in w/ other stuff, like remember what stuff is inside the case once split.
Oh and yamabond on both case halves...both sides ...make sure as clean as possible for good seal...points cleaner, electronics parts cleaners...stuff like that will prep the surface. Cases i wash in simple green.
If you really want to show off, send you gears to Ed Erlenbach and have him check them out, I think he still does along w/ cylinder exchanges for porting and stuff. I think ED set the land speed record on the AIRCOOLED RD400 around 164 mph...that is too *ucking amazing. 86 HP for this guy is starting point for an aircooled dragster.
1984 RZ350L (U.S.) Old Toomeys, oil injected!, Y-boot K&N. loctite throttle cable holder on left carb!! , 410 mains, Dynojet needles 2.0 clip, #20 pilot @ 1.5 turn a.s., 240/512 p.v.
-
patastinky
- Posts: 52
- Joined: Fri May 16, 2014 1:40 am
Re: RD350B sitting for 20 years precautions before starting?
Wow! Thank you!! Friday I'll go out and get the materials I need. I'm confident that the disassembly will go well. Like yourself I am very organized when it comes to taking things apart. I use the Baggie method often. AT&T he dollar store you can pick up a pack of 40 ziplock (no name brand) for $1.33 after taxespushstartrearset wrote:it will be easy if you catalogue. 2 large gallon bags. 1 bag for top case bolts. 1 bag for bottom nuts / bolts. The Top numbers "T". Bottom numbers "B"...followed by 1,2,3, etc. Tap Plastics sells these tiny bags that'll I'll label T1, T2, B1, B2 (EDIT: label them according to the bolt numbers in teh FACTORY manual..so if that bolt corresponds w/ T12 in the factory picture...label it T12 and not your own picked number to avoid confusion!) and store them in their respective bags. You'll want a piece of wood to separate the cases w/o damage (tap w/ thor hammer or dead blow front to back, slowly..comes a little at a time). Be sure to follow the manual procedure for reassembly (inch-lb torque wrench). This is important. As you have different length bolts and putting in the wrong length bolts and tightening / torqueing out of sequence/order can strip a case and catalogueing will eliminate errors of bolt placement. Things to look for. The ball bearing likes to roll out and hide when you remove the clutch push rod <---keep an eye out for it and bag it.. just tipping the engine adn the ball bearing will fall out.
First thing remove ignition rotor w/ the upper case mount bolt (the big one of the 3 i believe), bike in gear hold both brakes, pop loose.
2nd thing is to get the countershaft sprocket off. If motor still in bike, put in gear, hold both brakes...preferable a breaker bar w/ the right socket and pop loose (while sitting on bike). REmove sprocket, set chain aside on swingarm.
Drain tranny oil first!! 3rd remove right side cover...place a thick shop cloth between clutch basket gear and primary (crank). remove primary nut. To remove clutch nut, i use the motion pro clutch basket holding too. looks like a weird set of vice grips. AT this point w/ the basket removed EDIT: there is a triangular brace behind where basket sat held by 3 large inset phillips heads screws-->REMOVE!! as it will not allow you to separate case halves w/i in place!! (remember the basket washer and the clutch plate / steel plate order...if stock it will have the rubber rings...non-stock replacements discards the rubber rings.. there is the shift shaft w/ a small HAT that can easily be lost that sits atop the shifter arm extension....<be careful and bag and tag and remember this hat to be put back or you'll have problem shifting when you slap it back together. I have never had to remove the shift drum, or detent at bottom of case so i leave those alone unless otherwise. NOTE: when you get to the gears w/ their wavy washers spacers and stuff, put them in plastic bags in exploded order and label. This all makes reassembly mostly painless and quick and easy. I do this every time w/ every build.... no lost nuts and bolts and no guessing.
someone else can chime in w/ other stuff, like remember what stuff is inside the case once split.
Oh and yamabond on both case halves...both sides ...make sure as clean as possible for good seal...points cleaner, electronics parts cleaners...stuff like that will prep the surface. Cases i wash in simple green.
If you really want to show off, send you gears to Ed Erlenbach and have him check them out, I think he still does along w/ cylinder exchanges for porting and stuff. I think ED set the land speed record on the AIRCOOLED RD400 around 164 mph...that is too *ucking amazing. 86 HP for this guy is starting point for an aircooled dragster.
-
Redline Junkie
- -----
- Posts: 624
- Joined: Tue Dec 25, 2012 12:55 pm
- Location: Halifax, Nova Scotia Canada
Re: RD350B sitting for 20 years precautions before starting?
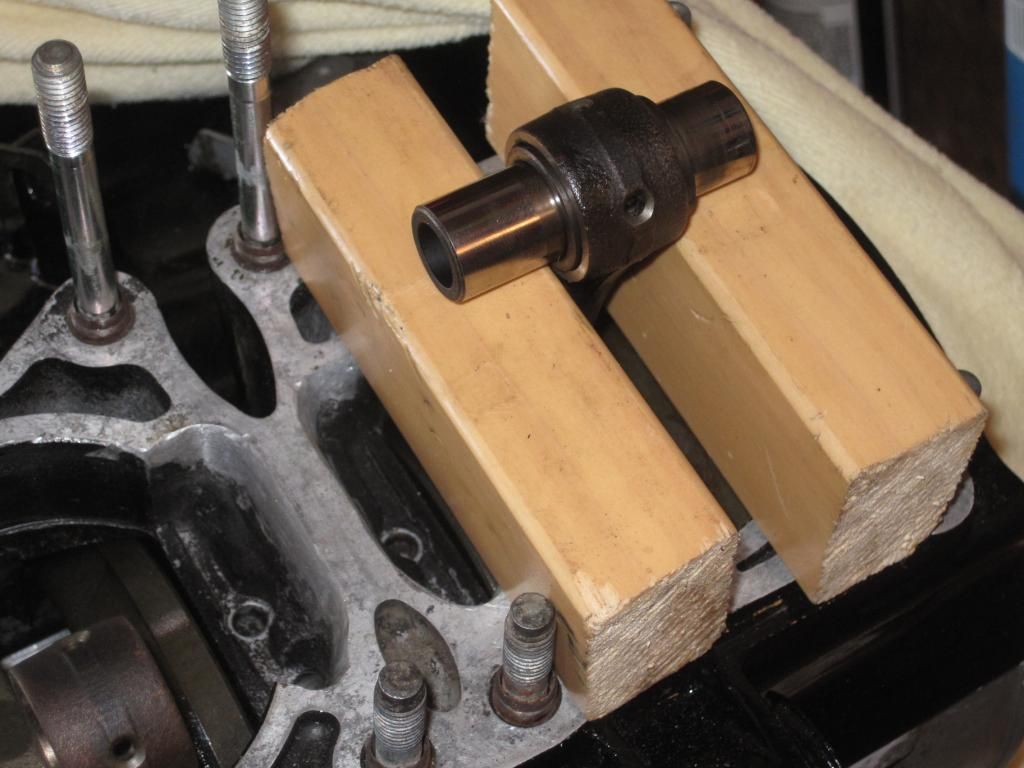
Here is how I lock the crank up for easy Primary Drive, fly wheel nut removal and torquing.
1985 RZ350F being restored now!
1987 RZ350 Stock
1985 RZ350F basket case
1985 RZ500 Stock
1987 RZ350 Stock
1985 RZ350F basket case
1985 RZ500 Stock
Re: RD350B sitting for 20 years precautions before starting?
Nice trick using the 1x2 wood blocks.
Good instructions on splitting cases.
Good instructions on splitting cases.
RZ350K and RD350B, original owner
Both running!!
CR500R ... waking up
Motors by: Roger @ WickedATV
My RD-350 rebuild page updated 6/10/12
Both running!!
CR500R ... waking up
Motors by: Roger @ WickedATV
My RD-350 rebuild page updated 6/10/12
-
patastinky
- Posts: 52
- Joined: Fri May 16, 2014 1:40 am
Re: RD350B sitting for 20 years precautions before starting?
Redline Junkie wrote:Here is how I lock the crank up for easy Primary Drive, fly wheel nut removal and torquing.
Sweet. Thank you!
-
patastinky
- Posts: 52
- Joined: Fri May 16, 2014 1:40 am
Re: RD350B sitting for 20 years precautions before starting?
Is it customary to have the motor sandblasted to clean off any debris? Or is that only done if a rebuild is needed?
Re: RD350B sitting for 20 years precautions before starting?
I wouldn't sand blast it. Would be worried about abrasive particles. I use a paint brush and diesel.
RZ350K and RD350B, original owner
Both running!!
CR500R ... waking up
Motors by: Roger @ WickedATV
My RD-350 rebuild page updated 6/10/12
Both running!!
CR500R ... waking up
Motors by: Roger @ WickedATV
My RD-350 rebuild page updated 6/10/12
-
patastinky
- Posts: 52
- Joined: Fri May 16, 2014 1:40 am
Re: RD350B sitting for 20 years precautions before starting?
Thank you Joe.heyjoe wrote:I wouldn't sand blast it. Would be worried about abrasive particles. I use a paint brush and diesel.
By the way someone recommended this thread to me. I'm currently reading the entire thread. It's helpful to see a visual of what i'll be getting myself into :)
http://www.aircooledrdclub.com/smf/inde ... ic=25398.0" onclick="window.open(this.href);return false;