Mikes XS emulators in stock RZ forks- who has done this?
Moderator: rztom

Im keen to know about these as well, a forumer once stated that these $50 emulators were worth about the asking price in improvement, which was an absolutely useless statement as far as I was concerned, I had/have no real idea what that means. But if it meant that it was worth the price, then its worth the effort i guess, if it means $50 worth of improvements wasnt worth the hassle then thats different, and sadly he never actually explained his comment. Either way we need someone who doesnt talk in riddles to tell the rest of us what these are like I reckon.
80 XT500 Supermoto!
81 RD350LC Resto
82 RD421LC Hybrid
82 RD350LC decapitation project
82 RD250LC JDM '251LC' YPVS
83 RZ350 Resto
84 RZ500 Resto
85 RZ350 F1 Resto
86 RZ350 F2 Resto
86 RZ350 F2 Hybrid
Like Watches? www.PloProf.com & www.DeskDivers.com
81 RD350LC Resto
82 RD421LC Hybrid
82 RD350LC decapitation project
82 RD250LC JDM '251LC' YPVS
83 RZ350 Resto
84 RZ500 Resto
85 RZ350 F1 Resto
86 RZ350 F2 Resto
86 RZ350 F2 Hybrid
Like Watches? www.PloProf.com & www.DeskDivers.com
-
Evans Ward

- -----

- Posts: 1546
- Joined: Sun Jun 07, 2009 6:39 pm
- Location: Macon, GA
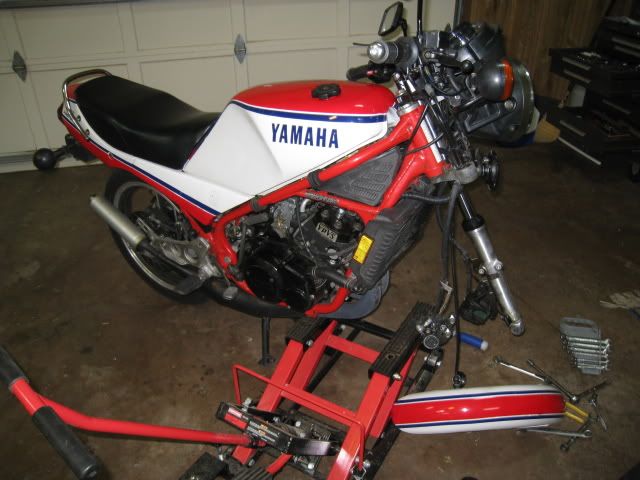
Almost to the stage of total accumulation of all of my parts for this job. Forks are off and my bike is on lift/ scissors jack in my shop...... 
Need to make a decision on weight of fork oil- any recommendations?
(Hope this isn't opening up the proverbial can 'o worms)


Need to make a decision on weight of fork oil- any recommendations?
(Hope this isn't opening up the proverbial can 'o worms)
84 RZ350-Toomeys,SCR milled head, stk 26 carbs,300 M, 35 P, stock regrooved needles AS 2.5 turns out,stk air box,Banshee reeds Zeel non-progr CDI,TSRL Program YPVS,alum rad,R6 shock,GV emulators w/RT springs,fork brace,Shindy steering damper.
(Edited) I found the answer to my question:
measure from the top of the oil to the top of the fork tube
The RT web site advises 5-10 or 15wt, 20wt is not listed. I'm running 10wt. Question I have is how much oil do you run. The RT web site advises the oil height to be 140mm my question is "how is this height measured?"
2010-Progessive springs, new bushings, and new seals going in. I was so disappointed in the RZ's front end when I got it. The springs made all the difference in the world. I preloaded the springs 3/4", that put the top of the spring bushing flush with the top of the fork tube. That means the preload equaled the thread length of the tube plugs.
1973 RD350
2014 Suzuki DT1000
1979 RD400F Daytona Special
1984 RZ350
2014 Suzuki DT1000
1979 RD400F Daytona Special
1984 RZ350

Well since they don't specify any other method of measuring the oil height I would imagine it's the same as other forks. Forks compressed w/o springs and measure from the top of the fork tube. Make sure forks have been pumped through their stroke a few times to get all the air out...evansje1 wrote:(Edited) I found the answer to my question:
measure from the top of the oil to the top of the fork tube
The RT web site advises 5-10 or 15wt, 20wt is not listed. I'm running 10wt. Question I have is how much oil do you run. The RT web site advises the oil height to be 140mm my question is "how is this height measured?"
...
-
Evans Ward
- -----
- Posts: 1546
- Joined: Sun Jun 07, 2009 6:39 pm
- Location: Macon, GA
NCRiding (Chris) and I knocked this mod out in a morning a few weekends ago. Thanks Chris!!  I did all the parts cleaning and hand and fine sanding after the brazing and that is tedious work. I can't wait to ride it to see how the front suspension feels and performs but my bike is on the lift for other work. I'll take other work one step at a time and will know that it will be an improved bike! Besides suspension upgrades, I'm doing brake, wheel bearing replacement, and cooling upgrades. Also had the chambers powder coated gloss black. Good times will come again!
84 RZ350-Toomeys,SCR milled head, stk 26 carbs,300 M, 35 P, stock regrooved needles AS 2.5 turns out,stk air box,Banshee reeds Zeel non-progr CDI,TSRL Program YPVS,alum rad,R6 shock,GV emulators w/RT springs,fork brace,Shindy steering damper.
Re: Mikes XS emulators in stock RZ forks- who has done this?
Well how's it going Evans? Did you get your forks completed? Out on a ride yet? Just looking for an update, my bike is in pieces. Talked to Roger today motor is done. Just got my frame back from power coat. Hopefully so I will be riding again. Later John
1985 RZ350NC. 1979 RD 400 Dayton Special 2015 KTM 690 DUKE
-
Evans Ward
- -----
- Posts: 1546
- Joined: Sun Jun 07, 2009 6:39 pm
- Location: Macon, GA
Re: Mikes XS emulators in stock RZ forks- who has done this?
Thanks for bumping my thread and reminding me that I haven't updated it John!  Yes, I've had about 3 rides on it since the Mikes XS emulators w/RT fork springs and what a huge difference it made over the progressive springs I had in it!
  Feels really nice. Chris (NCriding) and I set the spring rate on the MikesXS emulator at 3 turns out and it was perfect for my weight. The bike feels and handles more like a modern bike now and can't wait until about 2 mths when I get to ride the twisties at the Deal's Gap Meet! I highly recommend this upgrade. I'm also in the process on upgrading my Kawasaki H2's suspension as I have Race Tech single rate/ linear fork springs and a set of Hagon rear shocks on order. Got to get that old girl up to spec too. Wish I would have started with suspension upgrades first before anything else!
84 RZ350-Toomeys,SCR milled head, stk 26 carbs,300 M, 35 P, stock regrooved needles AS 2.5 turns out,stk air box,Banshee reeds Zeel non-progr CDI,TSRL Program YPVS,alum rad,R6 shock,GV emulators w/RT springs,fork brace,Shindy steering damper.
-
pushstartrearset

- -----
- Posts: 1339
- Joined: Thu Mar 17, 2011 4:20 pm
- Location: Vancouver, WA
Re: Mikes XS emulators in stock RZ forks- who has done this?
I would love to see a pictorial writeup on this. I don't have a clue how this would go together, but a step-by-step pictorial would be most appreciated!! I suspect the same emulator could be used on the 400F forks also?
1984 RZ350L (U.S.) Old Toomeys, oil injected!, Y-boot K&N. loctite throttle cable holder on left carb!! , 410 mains, Dynojet needles 2.0 clip, #20 pilot @ 1.5 turn a.s., 240/512 p.v.
-
joolstacho
- Posts: 28
- Joined: Thu Sep 06, 2012 5:12 am
- Location: Melbourne
Re: Mikes XS emulators in stock RZ forks- who has done this?
MikesXS valve conversion isn't quite as straightforward as it seems (if you read some posts).
Removing the inner piston tube: -it's in there tight, I made up an angled brass drift and used a bit of heat at the 'mushroom end' and a fair bit of force. (bigger 'ammer!)
Ok, now you have the fact that Mike's valve doesn't fit into the piston tube top housing. You need to positively locate the valve otherwise the spring may displace it and it could scrape around inside the stanchion.
On another forum there's the suggestion to open up the piston housing by grinding. I don't reckon you could ever get an accurate enough ledge for the valve by grinding. The valve needs to sit up dead central within the fork stanchion. Job for a lathe I reckon. (or see sleeve insert option below)
Now, the piston ring groove in the damper rod is narrower than the valve, and it's only about 3-4mm below the top. This means that opening the housing up would weaken it at the ring groove area if you go down too deep. I machined mine down about 1mm -enough for positive location of the valve, but not so much that the rod is weakened.
(Another option would be to insert a sleeve into the piston (approx 21.5 OD and 16.3 ID) this would mean the lower (smaller dia) part of the valve would insert, and the larger base would sit on the top of the piston.
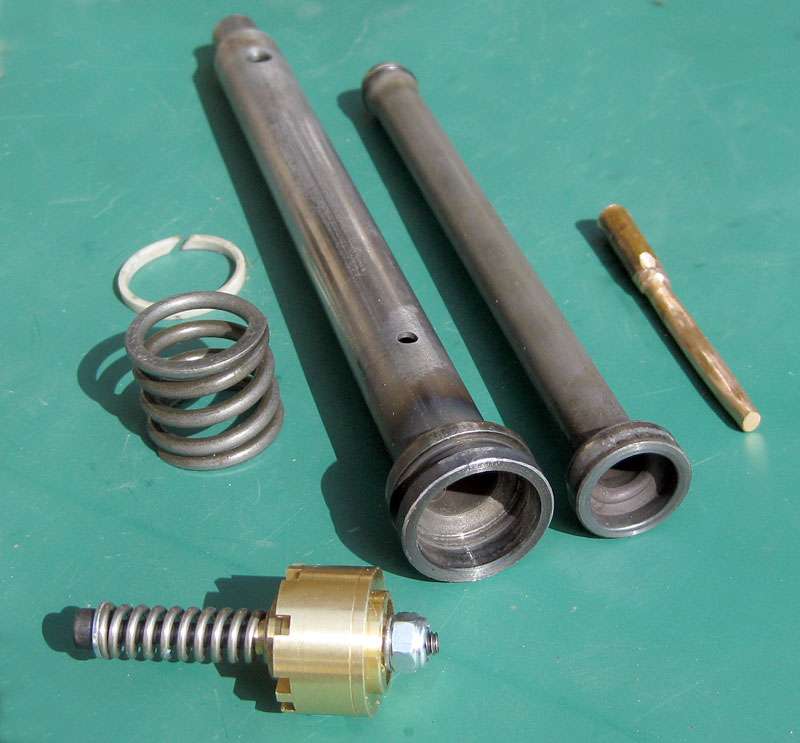
I drilled x 6 8mm compression holes at the damper tube base, I brazed up the rebound holes at the top (ignored the 2 little ones) and drilled x1 2mm hole. I'm using 10w fork oil.
A 550mm length of 1/2"OD x 3/8" ID alloy tube (Bunnings) - greatly aids assembly.
I haven't run the bike yet, but static it seems to have very nicely controlled damping. I've set the valve at 2.5 turns in as a starting point for brisk roadwork. Time will tell.
Jools
Photo - shows components before drilling and machining
Removing the inner piston tube: -it's in there tight, I made up an angled brass drift and used a bit of heat at the 'mushroom end' and a fair bit of force. (bigger 'ammer!)
Ok, now you have the fact that Mike's valve doesn't fit into the piston tube top housing. You need to positively locate the valve otherwise the spring may displace it and it could scrape around inside the stanchion.
On another forum there's the suggestion to open up the piston housing by grinding. I don't reckon you could ever get an accurate enough ledge for the valve by grinding. The valve needs to sit up dead central within the fork stanchion. Job for a lathe I reckon. (or see sleeve insert option below)
Now, the piston ring groove in the damper rod is narrower than the valve, and it's only about 3-4mm below the top. This means that opening the housing up would weaken it at the ring groove area if you go down too deep. I machined mine down about 1mm -enough for positive location of the valve, but not so much that the rod is weakened.
(Another option would be to insert a sleeve into the piston (approx 21.5 OD and 16.3 ID) this would mean the lower (smaller dia) part of the valve would insert, and the larger base would sit on the top of the piston.
I drilled x 6 8mm compression holes at the damper tube base, I brazed up the rebound holes at the top (ignored the 2 little ones) and drilled x1 2mm hole. I'm using 10w fork oil.
A 550mm length of 1/2"OD x 3/8" ID alloy tube (Bunnings) - greatly aids assembly.
I haven't run the bike yet, but static it seems to have very nicely controlled damping. I've set the valve at 2.5 turns in as a starting point for brisk roadwork. Time will tell.
Jools
Photo - shows components before drilling and machining
Re: Mikes XS emulators in stock RZ forks- who has done this?
I took a bunch of pictures, and planned on explaining what I did as best I could......and then I noticed Jools post. Although he explained a lot, I am still going to write my post in hopes that it may answer any questions someone might have after reading Jools post.
First I took the rods out of the forks and seperated the inner rod from the outer rod. Like Jools said, it is really pressed in there. I didnt need any heat, but it took some good whacks with a hammer and punch. One thing you should know is that the inner rods will be discarded....so you dont need to worry about banging them up while you remove them. After the inner rod comes out it will look like this.
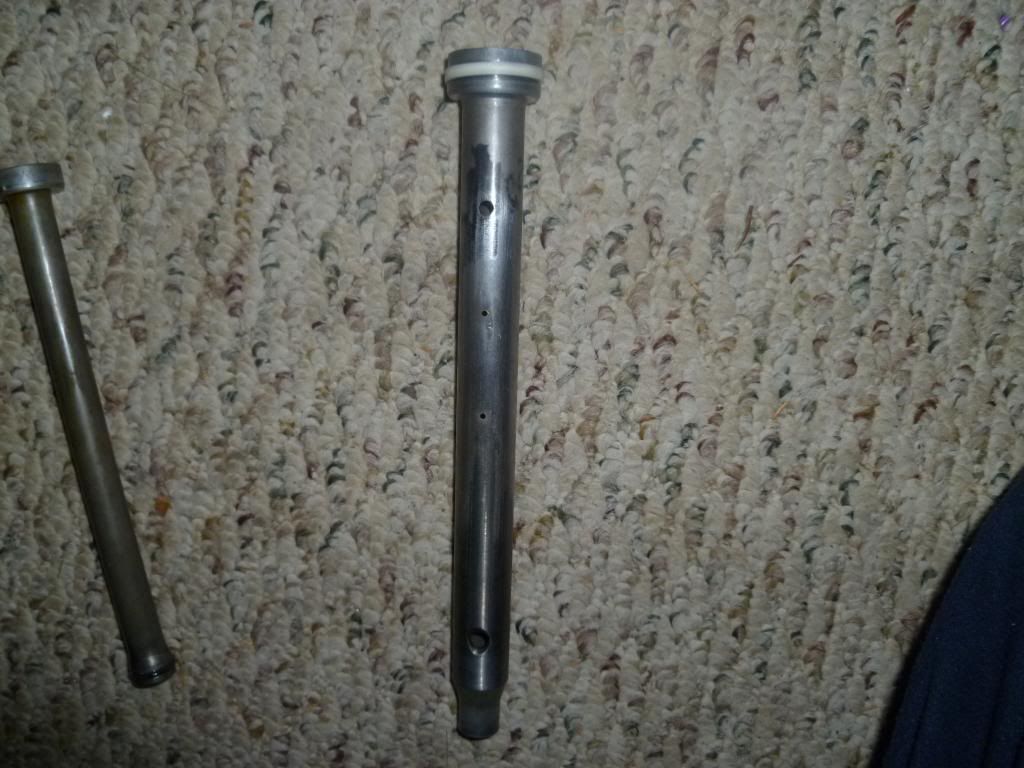
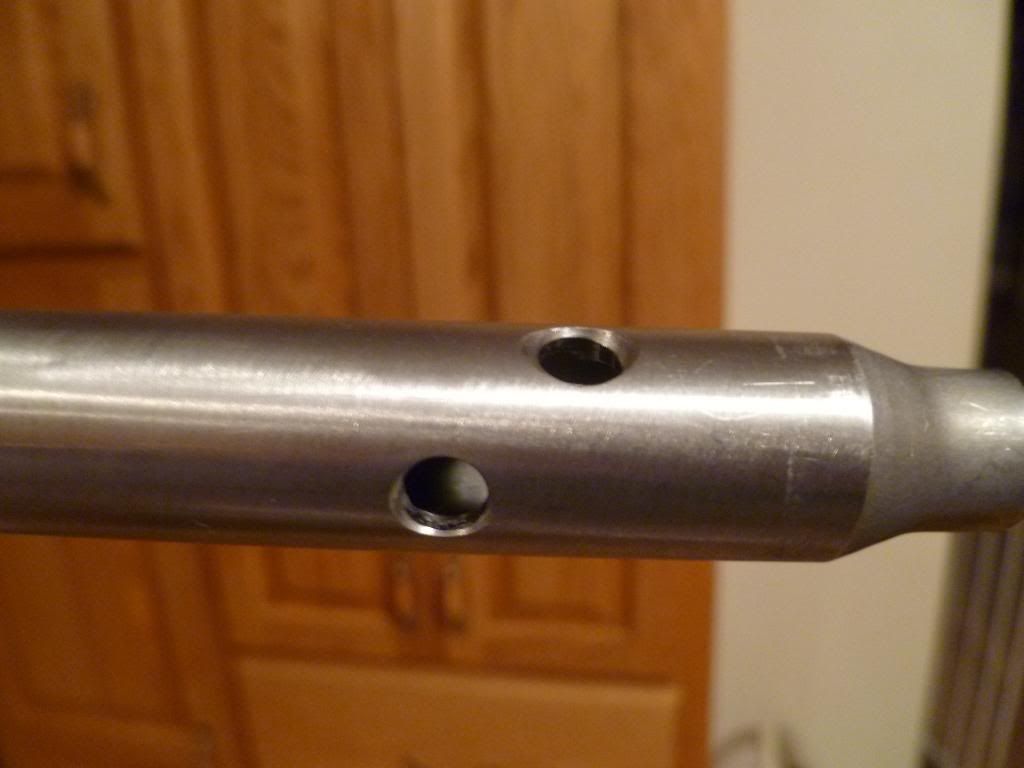
Once the inner rods are removed, they are discarded and you are left with the two larger outer rods to work with. Each large rod has four holes from about the mid point of the rod going up to the crown. Three of the holes are on one side, and the fourth hole is 180 degrees on the other side. You can see all four holes in the picture below. So there are eight holes total, you just cant see the other four holes because they are facing the carpet.
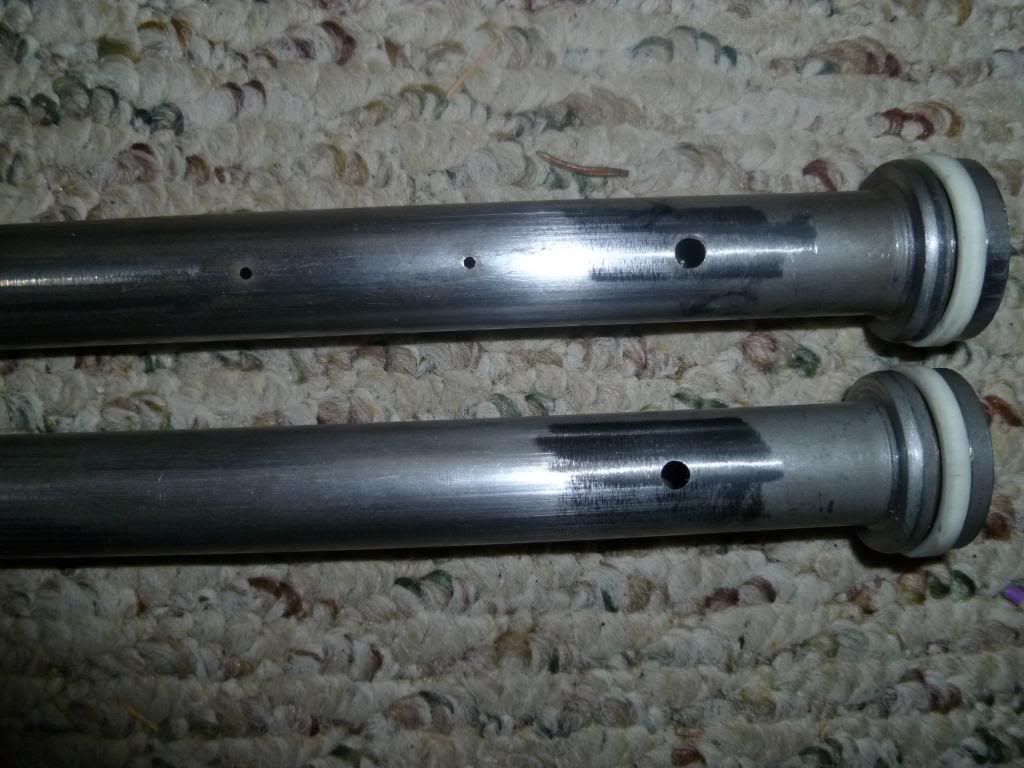
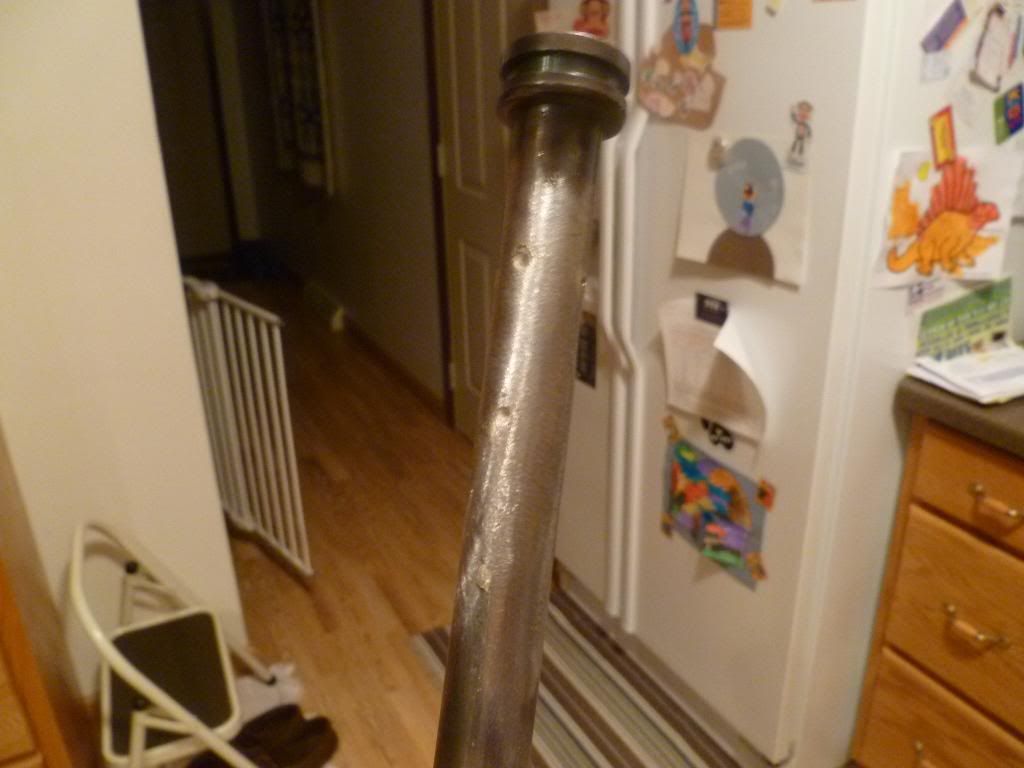
There has been some discussion about which of the four holes per rod to braze closed. Some have said you dont need to braze the two small holes per rod closed. I think that is what Jools was saying in his post. The instructions from Race-Tech say that those holes should be brazed closed...so I had all four holes per rod brazed over. I dropped my rods off at the shop to have them brazed and was very excited to pick them up when they were done. When I saw them, I crapped my pants. The guy thought he was doing me a favor, and ground all the excess braze off, along with large chunks of the rod itself. The rod has a "seal" that rides over it and when removing the excess braze, great care needs to be taken to ensure you do not remove any of the original material from the rod itself, and only get the braze. It needs to be smooth as a babies bottom. Well this guy went at it with a grinder and destroyed them. It is hard to see in the picture below, but there are hundreds of grooves, and many, many flat spots. Totally shot.
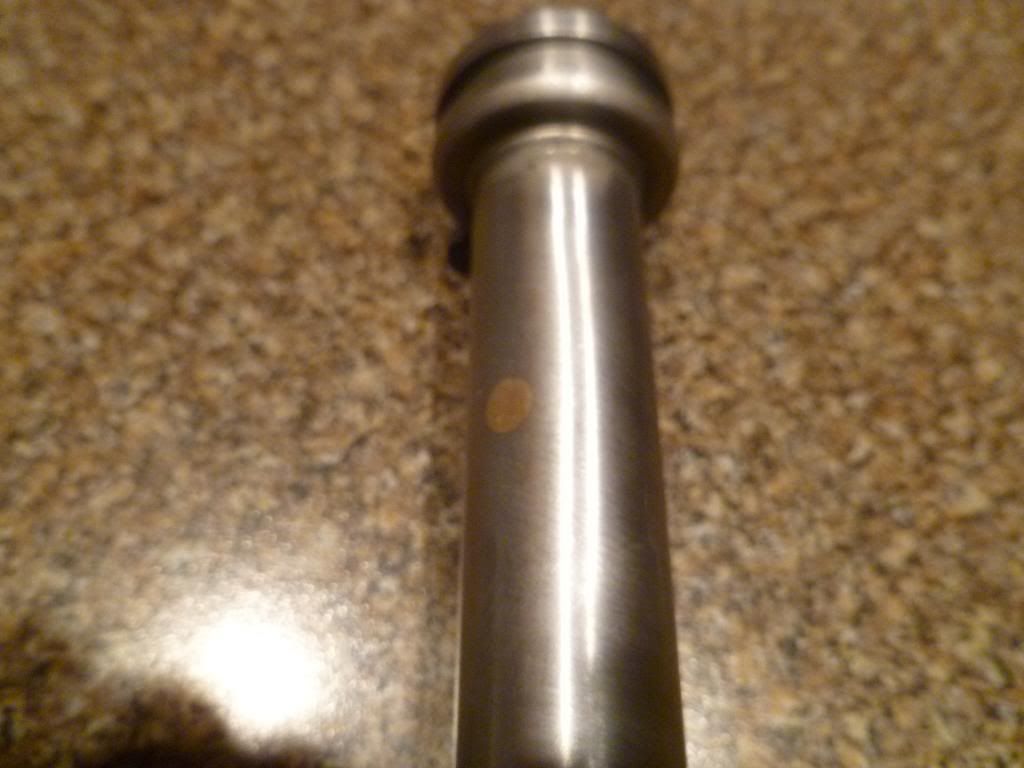
Thats when I PMed Silverstrom and asked if he had any spare fork rods in his parts stash. He did have some, but they were from a Canadian RZ. He sent the measurements and they were almost identical. The only differences that I noticed when I received them were that the tapered portion on the bottom is a little shorter on the Canadian rods (same total rod length though), the top crown diameter is slightly bigger (maybe 1mm or so) and there are only three holes on the top half of the rod that need to be brazed shut, not four. One of the small holes (the small hole closest to the top) is not on the Canadian fork rod. After I got my rods from Silverstrom, I told a guy at work what happened, and he said he would do the brazing for me. He did a great job, and his work is below.

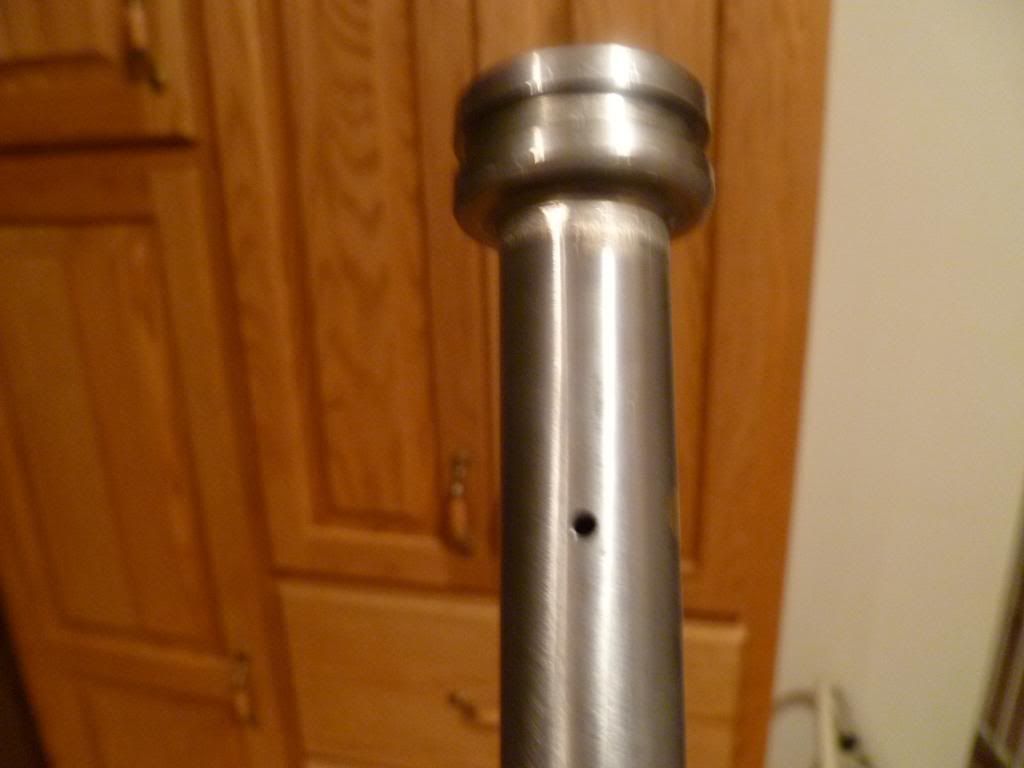
After the holes are brazed closed, new holes need to be drilled. A 2mm hole needs to be drilled from the bottom of the crown, and the large compression holes near the bottom (by the tapered part of the rod) need to be enlarged to 6mm. A second set of compression holes also needs to be drilled. These holes are 10mm up from the original holes and 90 degrees around. These new (and enlarged) holes also need to be filed (inside and out) and chamfered.
That is pretty much it. Like Jools mentioned, without any machining, the valve sits loosely on top of the rod.
The valve needs to cover the entire opening at the top of the rod at all times, and this loose fit made me nervous, so my friend removed a very small amount of material from the edge of the opening. As Jools stated, you dont want to remove too much material, or you may go through to the ring groove just below.
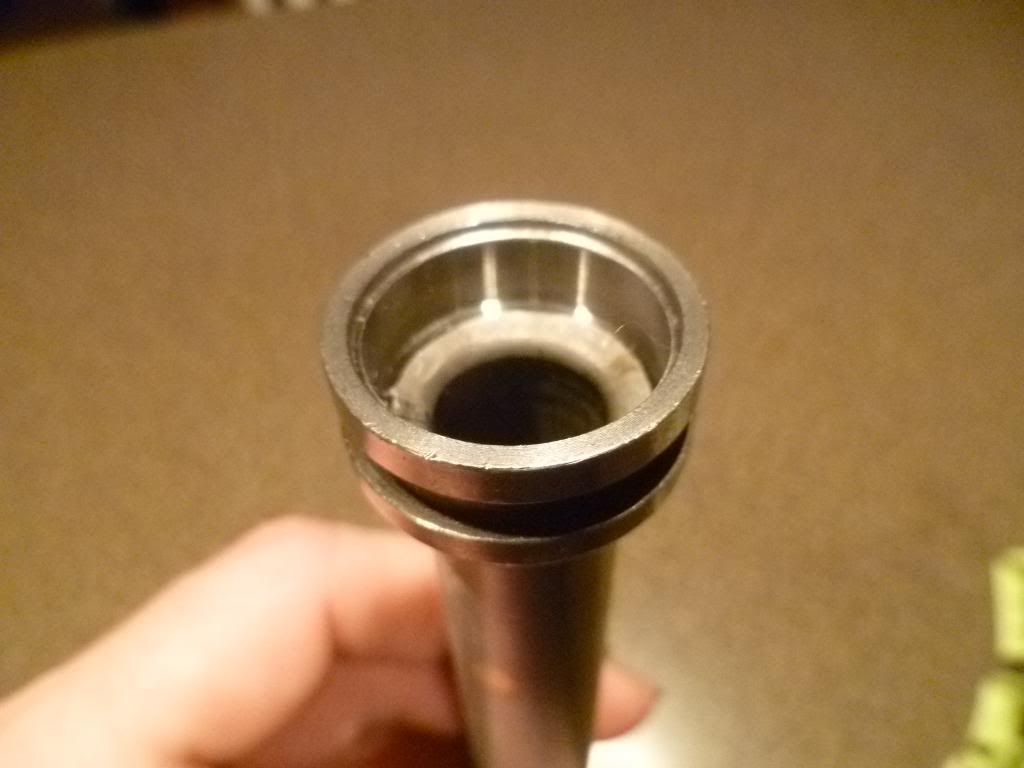
Now the valve sits much more secure and cannot move from side to side and potentially uncover that opening.
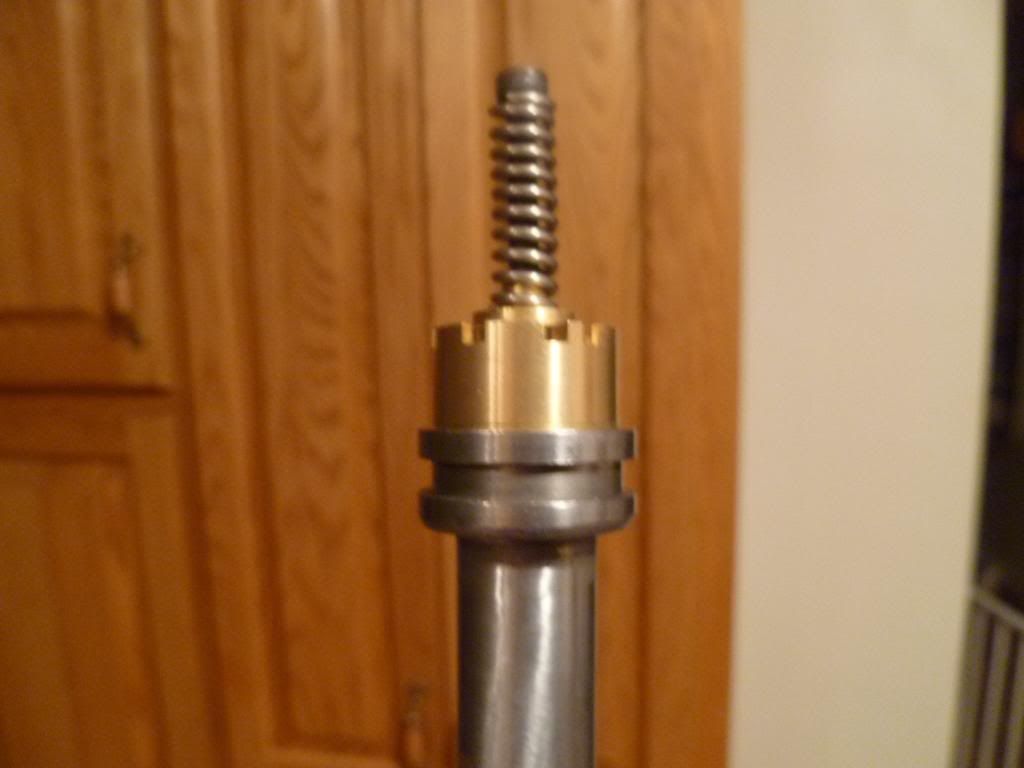
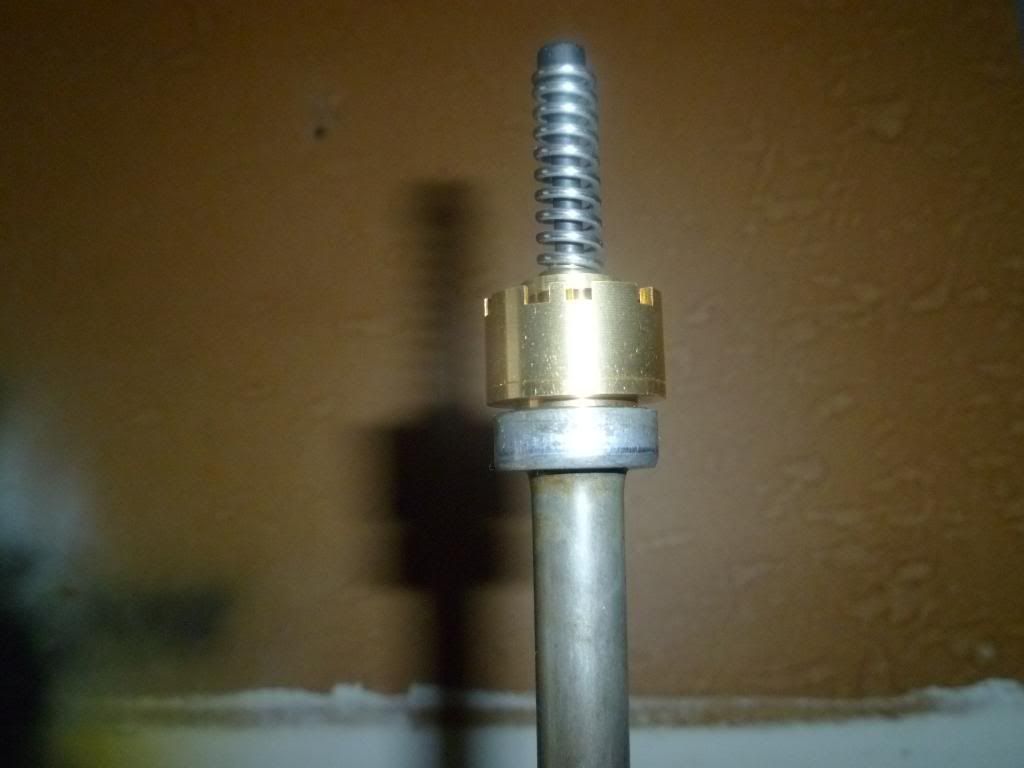
After these mods are made to your fork rods, you assemble the forks like normal, except you place the valve on top of the rod, and then the spring on top of the valve. Compression is controlled by the valve and can be adjusted with the bolt that goes through the center of the spring, and the nut on the bottom. I dont think it will be as hard to adjust as others have stated. Messy maybe, but not hard. I think you could just remove the cap at the top of your forks, take out the spring and use a parts grabber to reach in and get the valve out. make your adjustment and toss back in. Sounds easy...we'll see. Rebound is controlled by the weight of the fork oil you use. Higher weight oil....stiffer rebound, and vice versa. Here is a link from Race-Tech explaining why the valve is an improvement. http://www.racetech.com/HTML_FILES/DampingRodForks.HTML" onclick="window.open(this.href);return false;
As a side note, my friend was originally going to press some sleeves down the inside of the rod to cover the holes from inside. This would eliminate the need to braze, thus eliminating the need to file and sand the excess away, and eliminate the potential to screw up the outside surface of your rod. He did a practice run on one of my screwed up rods, and it looks good. The sleeve was long enough to cover all four holes, and I have no doubt it would have worked, but he decided it was too much BS and went the brazing route.

I know this post is long, but sometimes people skip over details because they think others will know what they are talking about. But I know there are other people out there, like myself, who dont know that much, and relatively easy jobs become intimidating. I also got a lot of help from some guys like Evans Ward, NCRiding, Tobster and Silverstrom. Thanks guys.
First I took the rods out of the forks and seperated the inner rod from the outer rod. Like Jools said, it is really pressed in there. I didnt need any heat, but it took some good whacks with a hammer and punch. One thing you should know is that the inner rods will be discarded....so you dont need to worry about banging them up while you remove them. After the inner rod comes out it will look like this.
Once the inner rods are removed, they are discarded and you are left with the two larger outer rods to work with. Each large rod has four holes from about the mid point of the rod going up to the crown. Three of the holes are on one side, and the fourth hole is 180 degrees on the other side. You can see all four holes in the picture below. So there are eight holes total, you just cant see the other four holes because they are facing the carpet.
There has been some discussion about which of the four holes per rod to braze closed. Some have said you dont need to braze the two small holes per rod closed. I think that is what Jools was saying in his post. The instructions from Race-Tech say that those holes should be brazed closed...so I had all four holes per rod brazed over. I dropped my rods off at the shop to have them brazed and was very excited to pick them up when they were done. When I saw them, I crapped my pants. The guy thought he was doing me a favor, and ground all the excess braze off, along with large chunks of the rod itself. The rod has a "seal" that rides over it and when removing the excess braze, great care needs to be taken to ensure you do not remove any of the original material from the rod itself, and only get the braze. It needs to be smooth as a babies bottom. Well this guy went at it with a grinder and destroyed them. It is hard to see in the picture below, but there are hundreds of grooves, and many, many flat spots. Totally shot.
Thats when I PMed Silverstrom and asked if he had any spare fork rods in his parts stash. He did have some, but they were from a Canadian RZ. He sent the measurements and they were almost identical. The only differences that I noticed when I received them were that the tapered portion on the bottom is a little shorter on the Canadian rods (same total rod length though), the top crown diameter is slightly bigger (maybe 1mm or so) and there are only three holes on the top half of the rod that need to be brazed shut, not four. One of the small holes (the small hole closest to the top) is not on the Canadian fork rod. After I got my rods from Silverstrom, I told a guy at work what happened, and he said he would do the brazing for me. He did a great job, and his work is below.
After the holes are brazed closed, new holes need to be drilled. A 2mm hole needs to be drilled from the bottom of the crown, and the large compression holes near the bottom (by the tapered part of the rod) need to be enlarged to 6mm. A second set of compression holes also needs to be drilled. These holes are 10mm up from the original holes and 90 degrees around. These new (and enlarged) holes also need to be filed (inside and out) and chamfered.
That is pretty much it. Like Jools mentioned, without any machining, the valve sits loosely on top of the rod.
The valve needs to cover the entire opening at the top of the rod at all times, and this loose fit made me nervous, so my friend removed a very small amount of material from the edge of the opening. As Jools stated, you dont want to remove too much material, or you may go through to the ring groove just below.
Now the valve sits much more secure and cannot move from side to side and potentially uncover that opening.
After these mods are made to your fork rods, you assemble the forks like normal, except you place the valve on top of the rod, and then the spring on top of the valve. Compression is controlled by the valve and can be adjusted with the bolt that goes through the center of the spring, and the nut on the bottom. I dont think it will be as hard to adjust as others have stated. Messy maybe, but not hard. I think you could just remove the cap at the top of your forks, take out the spring and use a parts grabber to reach in and get the valve out. make your adjustment and toss back in. Sounds easy...we'll see. Rebound is controlled by the weight of the fork oil you use. Higher weight oil....stiffer rebound, and vice versa. Here is a link from Race-Tech explaining why the valve is an improvement. http://www.racetech.com/HTML_FILES/DampingRodForks.HTML" onclick="window.open(this.href);return false;
As a side note, my friend was originally going to press some sleeves down the inside of the rod to cover the holes from inside. This would eliminate the need to braze, thus eliminating the need to file and sand the excess away, and eliminate the potential to screw up the outside surface of your rod. He did a practice run on one of my screwed up rods, and it looks good. The sleeve was long enough to cover all four holes, and I have no doubt it would have worked, but he decided it was too much BS and went the brazing route.
I know this post is long, but sometimes people skip over details because they think others will know what they are talking about. But I know there are other people out there, like myself, who dont know that much, and relatively easy jobs become intimidating. I also got a lot of help from some guys like Evans Ward, NCRiding, Tobster and Silverstrom. Thanks guys.
-
graham heise
- Posts: 291
- Joined: Sun Sep 16, 2012 7:10 am
- Location: gold coast Australia
Re: Mikes XS emulators in stock RZ forks- who has done this?
G'day race fans.
I really want to improve the front end of my bike (84 model). I phoned an Australian dealer for race tech emulators and springs. Quoted $219 emulators, $180 for springs plus delivery. I would like to save a few dollars on this if possible. Can anyone tell me where i can buy these cheaper Mikes xs emulators for an /aussie customer? Can't find on the net. Also i have 2 sets of forks. 83 model linear and 85 model progressive. Will these emulators work in both and is the 85 fork a better option to modify for use in a track bike besides the ability to use clip ons? Also can a linear spring be used in place of the progressive. maybe a little of topic but i' m keen to get a start on an upgrade. Graham
I really want to improve the front end of my bike (84 model). I phoned an Australian dealer for race tech emulators and springs. Quoted $219 emulators, $180 for springs plus delivery. I would like to save a few dollars on this if possible. Can anyone tell me where i can buy these cheaper Mikes xs emulators for an /aussie customer? Can't find on the net. Also i have 2 sets of forks. 83 model linear and 85 model progressive. Will these emulators work in both and is the 85 fork a better option to modify for use in a track bike besides the ability to use clip ons? Also can a linear spring be used in place of the progressive. maybe a little of topic but i' m keen to get a start on an upgrade. Graham
yamaha fanatic.
-
Evans Ward
- -----
- Posts: 1546
- Joined: Sun Jun 07, 2009 6:39 pm
- Location: Macon, GA
Re: Mikes XS emulators in stock RZ forks- who has done this?
Graham- look here/ link below for the Mikes XS emulators
http://www.mikesxs.net/product/27-1086.html" onclick="window.open(this.href);return false;
You may want to shop around on the single rate springs. I paid about $130 for a pair of Race Tech ones.
http://www.mikesxs.net/product/27-1086.html" onclick="window.open(this.href);return false;
You may want to shop around on the single rate springs. I paid about $130 for a pair of Race Tech ones.
84 RZ350-Toomeys,SCR milled head, stk 26 carbs,300 M, 35 P, stock regrooved needles AS 2.5 turns out,stk air box,Banshee reeds Zeel non-progr CDI,TSRL Program YPVS,alum rad,R6 shock,GV emulators w/RT springs,fork brace,Shindy steering damper.
-
joolstacho
- Posts: 28
- Joined: Thu Sep 06, 2012 5:12 am
- Location: Melbourne
Re: Mikes XS emulators in stock RZ forks- who has done this?
Good thorough explanation Juicebox, well done mate.
Grahame, I've just fitted Mikes XS emulators, cost was about $90 delivered to Oz, (postage was $40!). IMHO you don't need to shell out big bucks for Racetechs and new springs to get a good front end.
I'm very happy with the result, even though I'm using just the ol' stock RZ springs. Though I've only done a short test so far the front end seems very smooth and well controlled. And I'll be able to fine-tune the damping as I go if I feel the need.
Much better setup, -do it.
-
graham heise
- Posts: 291
- Joined: Sun Sep 16, 2012 7:10 am
- Location: gold coast Australia
Re: Mikes XS emulators in stock RZ forks- who has done this?
[quote="Evans Ward"]Graham- look here/ link below for the Mikes XS emulators
http://www.mikesxs.net/product/27-1086.html" onclick="window.open(this.href);return false;
Thanks Evan. The link takes me to the page for xs650 emulators. They don't list in there catalogue Rz350 . Are these xs650 emulators the right ones?
http://www.mikesxs.net/product/27-1086.html" onclick="window.open(this.href);return false;
Thanks Evan. The link takes me to the page for xs650 emulators. They don't list in there catalogue Rz350 . Are these xs650 emulators the right ones?
yamaha fanatic.
-
steveloomis

- -----
- Posts: 1507
- Joined: Tue Dec 06, 2011 11:18 am
- Location: Oklahoma USA
Re: Mikes XS emulators in stock RZ forks- who has done this?
Thanks guys, this is EXACTLY what I wanted to see. I too have been toying with doing this as well. I am anxious to hear how Jools forks perform with Mikes emulators. I cannot see paying such an excess for RaceTech emulators and resisted buying them when I did buy springs from RaceTech. I certainly would like a better ride than the harsh one I have. I put heavier springs in for my weight for both front and Haygon on the rear of my LC (RZ not on the road yet) and they do handle the "excess" weight... 
Steve
Steve
'81 RD350LC hybrid w/84 RZ engine. Zeel, Old style Toomeys, Yboot and filter 420 main 22.5 pilot, Air screw 2.5 turns out, DJ needle 2nd from top, Canadian VM26 carbs.
'85 KR/RZ US. Tank is seeping causing a blister in paint.....
'85 KR/RZ US. Tank is seeping causing a blister in paint.....