Solo cowl
Moderator: rztom
The Yamaha cowl attaches at the rear using two 32mmx3.4mm O rings. They go around the turn signal stalks and go up and over the tabs that are on the back of the cowl. You can see it just to the right of my tail light.
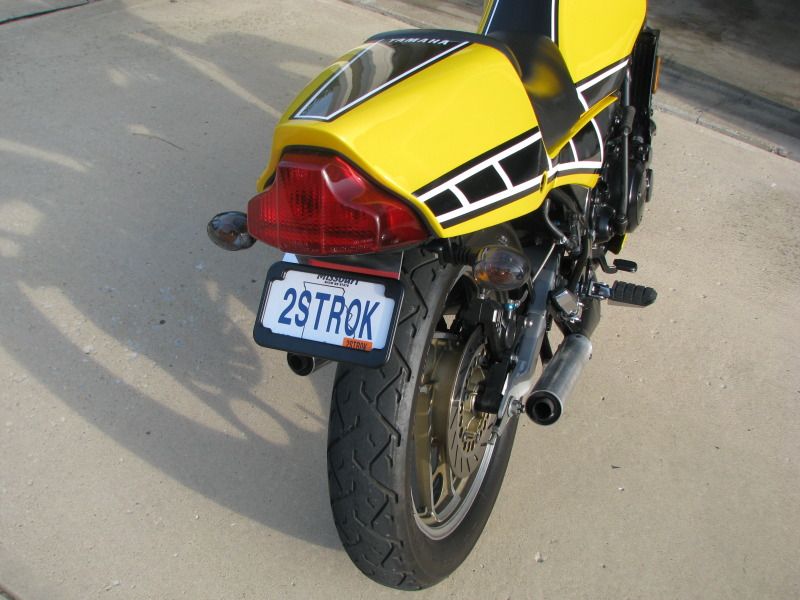
They were a little tight getting on the first time. But I had them off yesterday to fill my oil tank and they went back on fairly easily.
They were a little tight getting on the first time. But I had them off yesterday to fill my oil tank and they went back on fairly easily.
1984 RZ350L
Many thanks to www.WilsonPerformance.net !!!
Many thanks to www.WilsonPerformance.net !!!
-
Evans Ward

- -----

- Posts: 1546
- Joined: Sun Jun 07, 2009 6:39 pm
- Location: Macon, GA
The seat brackets provide the main system of support for the solo seat cowl. 2 screws for the bracket through seat side to the seat latch screw points and 2 screws to secure cowl to upper bracket attachment that are hidden by the small butt cushion seat piece. The O rings keep the rear of the piece secure from flopping around vertically but it won't move too far if one or both O rings come off. For the O ring attachments, there are inner tabs glassed to the inside of the cowl (both sides) where the O ring loops too. The other end is seen in Brian's above picture arouund turn signal mounts. Thanks for posting the size needed Brain on the rubber O ring as I have one that is too tight and keeps coming/ slipping off. You have a beautiful bike too BTW and it turned out spectacularly! 
84 RZ350-Toomeys,SCR milled head, stk 26 carbs,300 M, 35 P, stock regrooved needles AS 2.5 turns out,stk air box,Banshee reeds Zeel non-progr CDI,TSRL Program YPVS,alum rad,R6 shock,GV emulators w/RT springs,fork brace,Shindy steering damper.
Thanks Evans! We are pretty happy with the work so far.
Here's a little tid bit that I didn't put in my build thread. My cowl had some work done to it at one time or another. The holes behind the pad had been partially filled with putty. You could kind of see where they had been but not really. When we went to mount it up, there was no way to see where the bracket and it's hole were because they were hidden behind the cowl, but we could tell that they weren't even close. Solution? We stuck a couple of plastic zip ties through the holes, went through the mounting brackets and cynched them down tight. They are hidden by the pad, so you can't see them and they aren't going anywhere.
Someday I MIGHT get the balls to start drilling holes in my cowl, but not anytime soon!!
1984 RZ350L
Many thanks to www.WilsonPerformance.net !!!
Many thanks to www.WilsonPerformance.net !!!
-
Evans Ward
- -----
- Posts: 1546
- Joined: Sun Jun 07, 2009 6:39 pm
- Location: Macon, GA
Funny you mentioned that Brian. When I had my solo cowl repainted this past time, I discovered that the PO had glassed over the holes where the upper seat braket mounts to cowl. I did get up the nerve to drill new holes only after I studied as many pics as I could find on the net. Thanks Mr. Gore for your invention as the reference pics really helped! 
 I was close enough to make things work and I used small rubber grommets on the allen head stainless bolts. One other thing I found in doing this was that you will need to carry the correct allen wrench with you to access the oil tank and under seat area for tools if away from your shop. What I found that works perfect is a small case will slide behind the butt cushion area on top of the seat portion not seen to place this wrench, spare O rings, etc. In my case, my youngest son's spare zippered DSI game case worked perfectly and was free from him! Thanks Will!
84 RZ350-Toomeys,SCR milled head, stk 26 carbs,300 M, 35 P, stock regrooved needles AS 2.5 turns out,stk air box,Banshee reeds Zeel non-progr CDI,TSRL Program YPVS,alum rad,R6 shock,GV emulators w/RT springs,fork brace,Shindy steering damper.
Wait. What?!? I just pop the O rings loose, and release the seat latches. My seat/cowl lifts off as one piece. I just did it last night to fill my oil tank.Evans Ward wrote:One other thing I found in doing this was that you will need to carry the correct allen wrench with you to access the oil tank and under seat area for tools if away from your shop. What I found that works perfect is a small case will slide behind the butt cushion area on top of the seat portion not seen to place this wrench, spare O rings, etc. In my case, my youngest son's spare zippered DSI game case worked perfectly and was free from him! Thanks Will!
1984 RZ350L
Many thanks to www.WilsonPerformance.net !!!
Many thanks to www.WilsonPerformance.net !!!
-
Evans Ward
- -----
- Posts: 1546
- Joined: Sun Jun 07, 2009 6:39 pm
- Location: Macon, GA
It may do as you mention Brian and I need to try that. How do you unlock and get your key out to pull out as one piece?
84 RZ350-Toomeys,SCR milled head, stk 26 carbs,300 M, 35 P, stock regrooved needles AS 2.5 turns out,stk air box,Banshee reeds Zeel non-progr CDI,TSRL Program YPVS,alum rad,R6 shock,GV emulators w/RT springs,fork brace,Shindy steering damper.
-
Evans Ward
- -----
- Posts: 1546
- Joined: Sun Jun 07, 2009 6:39 pm
- Location: Macon, GA
I don't know how to use mine without unlocking the seat? Mine will not unlatch without unlocking the seat with the key in the lock. With the key in the lock, I don't see a way to take it off as one piece with the seat?BrianT wrote:I have never tried the lock...yet!!!
84 RZ350-Toomeys,SCR milled head, stk 26 carbs,300 M, 35 P, stock regrooved needles AS 2.5 turns out,stk air box,Banshee reeds Zeel non-progr CDI,TSRL Program YPVS,alum rad,R6 shock,GV emulators w/RT springs,fork brace,Shindy steering damper.
I just went and played around with mine. I can't get the seat to lock at all.  Helmet lock works fine.
1984 RZ350L
Many thanks to www.WilsonPerformance.net !!!
Many thanks to www.WilsonPerformance.net !!!
Thanks for the help. Those o-rings came with the cowl, I just didn't no where they went or what they were for. I guess the solo cowl and that touring box that mounts to the gas tank were accessories. No info on them in service manual. Thanks again. Later John 
1985 RZ350NC. 1979 RD 400 Dayton Special 2015 KTM 690 DUKE
-
aaronmvrider

- -----
- Posts: 6607
- Joined: Tue Sep 02, 2008 7:44 am
- Location: Central Coast N.S.W Australia
found it..... been looking for this thread...
if anyone has there seat off... solo cover... could you take some photos of the brackets how they are secured to the tail..
how did you go with locking your seats.... my seat doesnt need a key... perhaps you have later model seats.... if i am reading this correctly....
decal kits... which company did you use...
Aaron...
should have mine next week.... OEM mint condition.... wrong colour 
if anyone has there seat off... solo cover... could you take some photos of the brackets how they are secured to the tail..
how did you go with locking your seats.... my seat doesnt need a key... perhaps you have later model seats.... if i am reading this correctly....
decal kits... which company did you use...
Aaron...
1 x 4mm stroker rz 375cc 1983
1 x 7mm stroker rz 443cc 1984 (under construction)
1 x rz 500
1 x mv agusta 1000
1 x 7mm stroker rz 443cc 1984 (under construction)
1 x rz 500
1 x mv agusta 1000
-
aaronmvrider
- -----
- Posts: 6607
- Joined: Tue Sep 02, 2008 7:44 am
- Location: Central Coast N.S.W Australia
not as good condition as described but it is intact and going to be painted ...
it came with all brackets... just need the orings.... 32mm
so will post it in my build thread when finished...paint etc..
Aaron
1 x 4mm stroker rz 375cc 1983
1 x 7mm stroker rz 443cc 1984 (under construction)
1 x rz 500
1 x mv agusta 1000
1 x 7mm stroker rz 443cc 1984 (under construction)
1 x rz 500
1 x mv agusta 1000
Decals for the usual source Aaron...
80 XT500 Supermoto!
81 RD350LC Resto
82 RD421LC Hybrid
82 RD350LC decapitation project
82 RD250LC JDM '251LC' YPVS
83 RZ350 Resto
84 RZ500 Resto
85 RZ350 F1 Resto
86 RZ350 F2 Resto
86 RZ350 F2 Hybrid
Like Watches? www.PloProf.com & www.DeskDivers.com
81 RD350LC Resto
82 RD421LC Hybrid
82 RD350LC decapitation project
82 RD250LC JDM '251LC' YPVS
83 RZ350 Resto
84 RZ500 Resto
85 RZ350 F1 Resto
86 RZ350 F2 Resto
86 RZ350 F2 Hybrid
Like Watches? www.PloProf.com & www.DeskDivers.com
-
aaronmvrider
- -----
- Posts: 6607
- Joined: Tue Sep 02, 2008 7:44 am
- Location: Central Coast N.S.W Australia