Hmm.... Not many comments on what Ive said here recently, ie none, is anyone still reading this I wonder?
For some time I’ve wanted a digital speedo on this bike, not least because I need an easy to read speedo as I seem to live in ‘cop central’ with a bunch of speed changes and school zones, but also ‘cos the RGV speedo cable is pretty tight across the 6 pots and worst of all for a speedometer; the rolling radius of my RGV front wheel will not match the old LC parts so the reading would be out anyway. The problem I had solutioning this was twofold; it had to fit in the OEM LC clock cases as this bike needs to keep the look of an LC and also it had to get its speed reading from somewhere that wasn’t the front wheel.
Luckily the modern world came to my rescue when a forumer posted a pic of a unit he had found for his bike. It had a nice big LCD display and was simply powered by 12v and was backlit. Being GPS it picked its speed input up from a GPS antenna so that solved one issue. It was designed for boats so would be able to repel rain and be used to being bumped around in use. Ok, it wasn’t quite the size needed as the LC clocks are massive by today’s standards at 100mm, but was close enough at 85mm to slide into the cases and not look too out of place and I thought it worked well enough visually, although said forumer had bought a white faced unit to match his custom white tacho. I wanted black and after a good search ebay proved the cheapest and provided me this kit...

So, to integrate it into the existing speedo side of the cluster...On the face of it this is reasonably easy. You could just wedge it in using the ‘legs’ (studs) from the new unit which although they are M4 they are almost the right length and spacing of the original tacho's M5 versions but yeah being me I didn’t do that as the spacing and the size isn’t quite right so I cut them off and while I could have fitted new studs the correct size and spacing to the new speedo, I decided to fit the whole gauge into an old LC speedo housing as I had a spare one. This allowed me to use the OEM fixings to hold the unit to the clock top cover, allowing the dash to be held together in the way Yamaha intended as well as giving me back the correct sized and spaced fixings for the bracket/back cover. Of course, I needed to relieve some areas of the speedo housing to allow the electric connector (where the back light used to be) and the GPS antenna to reach the unit and the GPS speedo’s single button – even though it should not be needed once the unit is setup to kms (it also does SOG, miles, nautical miles etc).
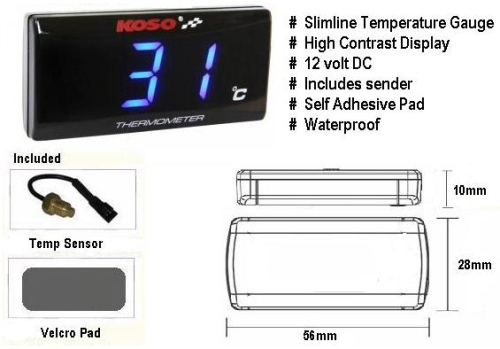
At the same time I wanted to sort out the tacho as well. The temp gauge on my unit didn’t work and with this bike being so far from OEM I wanted something with a digital readout. I had setup the temp on the EGT gauges but I’ve decided not to use them in v2.0 of this bike. It’s a long story but there is a lot of wiring on this one now, but also drilling and messing with the ceramic coated pipes seemed ‘excessive’. So I’ve decided to go back to the small blue LED Koso gauge, but have integrated it into the tacho. These are a great small unit and this one worked well when I had it installed before on the bars, plus, well, I have it. Ok, let’s address the elephant in the room; yes, it might well have been better with a red display to match the backlight perhaps, but I already had this one here and know it works, but yes I do know that Koso sell a red one, and I actually think the blue looks good now its done.
Ok, I should say, this is not an easy integration. As delivered the Koso is too large for simple integration into the tacho unit. I’d previously seen someone glue one into the tacho before (I expect with some cutting of the OEM tacho housing) but I wanted a total install, ie like it was built that way. This meant breaking apart the housing and pulling the electrics out and making the parts fit in a new smaller housing. In the grinding to fit even the circuit board didn’t escape that mod! I did this to fit the curve of the OEM tacho housing. These mods also included making the hole in the dial larger to accommodate the digits and the creating of a one-off smoked acrylic screen. Fiddly work and a good time to dust off those old modelmaking skills lol.
The screen hole was gently filed out to he right size and then smoked acrylic was cut larger than the hole and the new screen was recessed to fit in the space to look more modern and like it came like that from the manufacturer. This was glued to the dial using the filed flange at the back. (protecting paper still fitted in these pics)


The temp units innards were fitted in their new shaped case made from plastic off cuts and then cleaned up on a linisher, this pic is at an early stage of that process.

That was in turn also glued to the dial, sealed and reinforced so vibration won’t dislodge it and moisture cannot enter.

Then the fixing glue (Wurth replast) and the plastic of the new temp gauge case was all ground back to allow the dial to be centralised as it should be and then what was left exposed was painted flat black so if you do glimpse it through glass it doesn’t draw the eye as that’s the same finish as the dial. It was quite a bit neater when done than in the pic.
And of course, I want this bike to be right, so I'm not skimping on the good parts so I did all this to one of Kateannwells new LC tacho dials and fitted a brand new yuni parts XT500 (same as LC) needle as well. While it was all apart I fully cleaned and lubed the tacho mech, which is much simpler when you take away the temp unit, plus I needed to modify it a little to slide past the temp unit, which is now part of the dial of course. A good clean of the glass, rubber and plastic instrument parts and a repainted bezel completed the transformation which was then all crimped back together. This unit was really grubby actually, it really did need a refurb.
Ok, yes... Simple steps, but very very time consuming.
I felt the wiring could be nice and simple for these and to be honest it all came together elegantly, utilising a single OEM connector and making use of only 3 wires for the two instruments and their lighting; Switched 12v, ground and backlight feeds from the OEM tacho connection. I did this by adding an OEM style backlight from my stock of OEM connectors cut from old looms. The same source also gave me the correct connector to fit into the original tacho feed in the headlight bowl, using its temp gauge +/- and the tacho backlight feeds. Once wired up I made this into a proper loom by taping it up and its become a very neat solution to power all this, much less bulky than the OEM stuff as it’s one less connector now that the speedo mini loom isn’t connected, after all I was losing the distance portion of the auto cancel indicators anyway with the GPS speedo.

Red LED installed in the tacho to match the GPS's fixed red LED illumination.

(The random speeds shown on the GPS speedo are actually 'seconds', its counting up the time since it lost its GPS connection as I didn't have the antenna connected)
So there you have it, everything back in the OEM clock case and working using the simplified electrics. I only need to solution where to put the GPS antenna now... Oh and fit the RGV speedo drive delete spacer a mate is making for me :)
That reminds me, I should add here that a lot of this work couldn’t have been done without the help of my friends and in particular the forumer who sent me the needle rest when I dropped mine (it was never seen again, even tho I spent well over and hour looking on two seperate occasions), the plastics place who gave me an offcut of smoked acrylic and my mate Howard who hooked me up with my fave tool this year, a Wurth replast gun. I will admit that while I am a huge fan of Wurth’s replast product (as expect anyone reasing my posts knows) I really struggled with the cheap ‘dental’ gun I got off ebay and this proper unit not only fixes that problem, but makes it a joy to use. I’m now looking for what plastic part needs fixing next lol