4L0 vs 31K Stator/Rotor/CDI

General forum on troubleshooting electrical problems and modifications to electrical systems

Moderator: rztom

Message
Author
silverstrom
Moderator
Moderator
Posts: 7038
Joined: Wed Mar 24, 2010 2:20 am

Re: 4L0 vs 31K Stator/Rotor/CDI

#16 Post by silverstrom » Tue May 19, 2020 1:49 am

RZ350Street wrote: Mon May 18, 2020 8:09 pm When you say “test each cylinder separately” how do you do that?

What’s your preferred method for tracking down exactly what’s leaking? I sprayed everything I could see with windex watched for bubbles. I don’t know how else to find them.

Thanks for the help,
Kevin
I base any advice I give anyone on my own findings doing work here.

Swap the gauge and valve around and test from the other side the same way you did the first side. You would think it wouldn't matter, but it does. It matters for finding small leaks. I've seen it many times.

Windex might be handy, but it's not the best choice. LeakTec is the best stuff to use if you don't mind the cost. https://www.ebay.com/itm/LOT-OF-4-LEAK- ... SwcGtcgHTR A little warm water with a few drops of dish soap is all you really need.Apply with a small brush and wait. That will find most leaks. If you don't see an obvious leak, but you are losing pressure you need to be checking crank seals.

Any leak needs to be found, no matter how small. A small leak today will get bigger tomorrow. Several small leaks add up and can do damage. Just be absolutely certain you are holding pressure. 5 psi for 5 minutes or 6 psi for 6 minutes. It doesn't matter, as long as it holds. A properly sealed engine will hold pressure for a very long time. Certainly long past 5 or 6 minutes. And vacuum is just as important. Find leaks and fix them.

RZ350Street
Posts: 209
Joined: Sat Jun 27, 2009 10:49 pm
Location: Winnipeg, Manitoba

Re: 4L0 vs 31K Stator/Rotor/CDI

#17 Post by RZ350Street » Tue May 19, 2020 7:35 pm

As always, you are the voice of patience and reason my friend.

I brushed water and soap around every conceivable leak point and found nothing. I finally gave in and popped off the side case, rotor, stator and found a couple interesting things.

Image

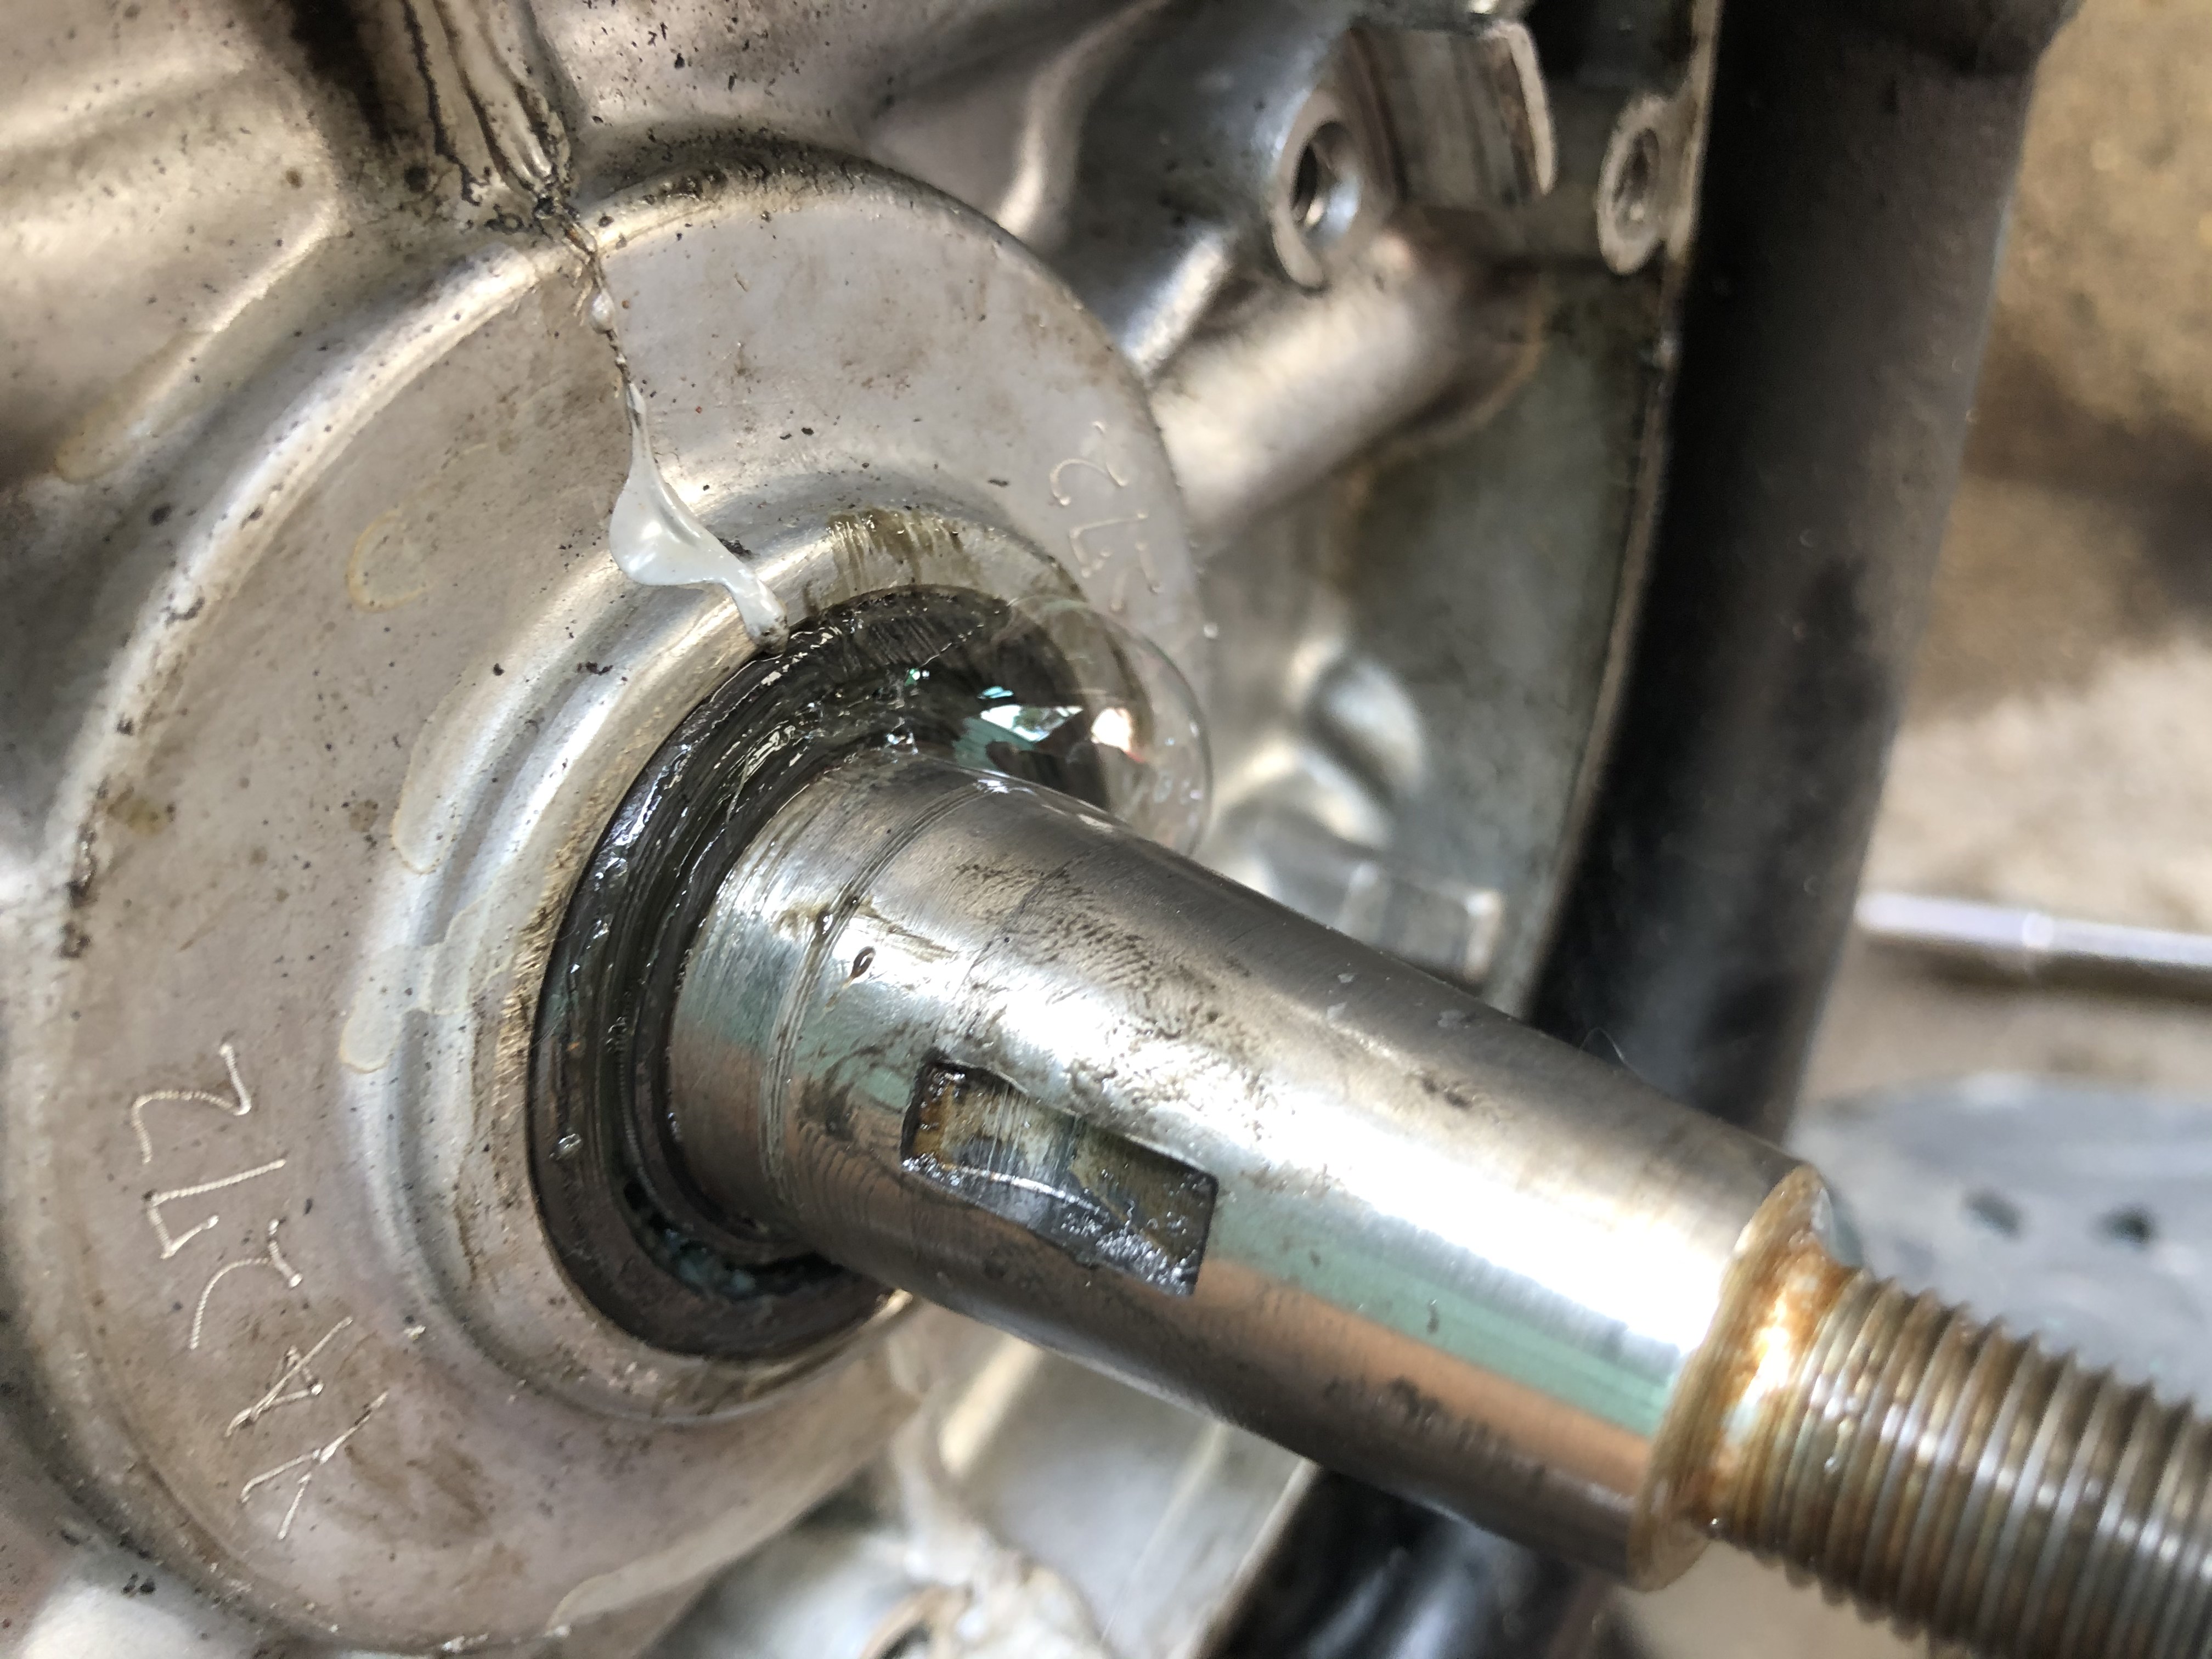
So first, I found a leak, as you can see the bubble there on the lower right. It leaks right against the crank on the lower part of the seal. What's the best way to go about sealing this? I mean, it's a freshly reassembled motor with a new seal, it would cost a small fortune in gaskets to pull it right apart and put another new seal in there with no better odds of success. There must be some way to try and fix it without disassembly? Also, how do you check the right side seal since it's internal? I put the crankcase breather tube in my soapy water dish and didn't get any bubbles, is that the right way?

Secondly, it appears the woodruff key had fallen out of the keyway at some point. I found it on the little lip on the engine casing just below the stator after removing the rotor and stator. It had a couple of dings in it and a rounded off corner and both keyways (rotor and shaft) had some metal shavings on the edges. I don't understand how this could have come out unless I knocked it out during assembly and didn't notice. I hypothesize that the flywheel slipped a bit on the crank and I was running with retarded timing, hence the lack of power? I'll track down a new key somewhere I guess.

So, looking for tips on seal fixing and any suggestions re: the crank key.

Kevin
1982 RD350LC
2018 Husqvarna Svartpilen 401

tacky1
Posts: 962
Joined: Wed May 13, 2015 1:11 am
Location: Pacifica,,

Re: 4L0 vs 31K Stator/Rotor/CDI

#18 Post by tacky1 » Tue May 19, 2020 8:48 pm

Sometimes the seals leak on a build, I had one of mine bubble up even with brand new genuine seals and a new crank, I ran it for a few hundred easy miles and it sealed up, So, I would run it easy for a few hundred, Then test again, Its a bigger problem with the LC350 which I dont understand as they use the same seal and almost identical cranks, You can find a lot of posts over on Norbos LC forum about leaky new seals and owners ran them like I did and they sealed up, Its like the seal softened up or just seated into place..
Your call.........
1985 RZv500
1984 RZ500 Hybrid
1986 RG500 Walter Wolf
1986 RG500 Skoal Bandit
1984 RZ350
1984 RZ350 Hybrid
1981 RD350LC
1981 RD350LC Hybrid
2009 CR500AF Supermoto 250X
2007 CR500AF 250X
1988 YSR50 (2)
1984 GPZ750 Turbo
1989 VFR750R RC30

silverstrom
Moderator
Moderator
Posts: 7038
Joined: Wed Mar 24, 2010 2:20 am

Re: 4L0 vs 31K Stator/Rotor/CDI

#19 Post by silverstrom » Wed May 20, 2020 1:26 am

Sometimes people make the mistake of not greasing the seals on installation. Then when the engine is started the dry seal rubs on the dry crank and wears the seal quickly. which leads to a pressure leak. It can happen very quickly.

It could also just be dirt or something else causing the leak. You can try the 35 mm film trick, as I often suggest to repair a leaking fork seal. Cut a piece of film at a 45 degree angle. Insert it between the seal and crank and run it around the seal a few times. Lube helps. That will often solve most small leaks that are not due to seal damage. At this point you have nothing to lose.

Is it a Yamaha crank seal? I ask because aftermarket crank seals have terrible springs in them and don't seal well. I did an engine for a guy that insisted on using cheap crank seals and a crank seal spring broke after 100 km. Now I inspect every spring on every seal I use.

There is also the possibility that there is wear on the crank itself. If that is the case it will never seal properly. Think of the shift shaft seal leaks we see, as an example of that.

If it was on the clutch side I'd worry less about it. On the flywheel side you have no wiggle room if it goes wrong.

RZ350Street
Posts: 209
Joined: Sat Jun 27, 2009 10:49 pm
Location: Winnipeg, Manitoba

Re: 4L0 vs 31K Stator/Rotor/CDI

#20 Post by RZ350Street » Wed May 20, 2020 12:51 pm

Well, there's no good news to report here.

I definitely greased it on install, and I could still see the grease on the seal when I found the leak. I believe it was a genuine Yamaha seal. I think I got all the seals from the dealer for this rebuild but I purchased many of them 5 years ago so I can't be certain.

I tried to clean it out with the film trick, not having any film on hand I tried various items until I found a feeler gauge of similar stiffness that would slip in. No noticeable dirt came out, and if anything it was worse after the attempt.

I decided to reassemble in the hopes that a quick run would help the seal settle in. Also, I wanted to test if replacing the rotor woodruff key and re-setting timing would correct at least the original issue I had set out to fix. No luck there either, still falls completely flat. Strobing it shows the timing is bang on at idle and 2k RPM, then it drifts towards retarded if I rev it up. If I understand correctly this is normal LC behaviour.

I really don't want to pull this guy all the way down, install another brand new seal and put it back together just hoping for the best. I can't believe that a small crank seal leak would make it run this poorly so I need to figure out what else is going on before I spend the time and money on another tear down.
1982 RD350LC
2018 Husqvarna Svartpilen 401

RZ350Street
Posts: 209
Joined: Sat Jun 27, 2009 10:49 pm
Location: Winnipeg, Manitoba

Re: 4L0 vs 31K Stator/Rotor/CDI

#21 Post by RZ350Street » Mon May 25, 2020 3:57 pm

Some positive news here finally! I cobbled the 31k stator/rotor/52Y-50 CDI onto the 4L0 for some testing. Physically the stator/rotor slip right on (with the 4L0 woodruff key, which is different from 31k key. Need the right key for the crank). The electrical loom is a little short so I initially mounted the CDI where the fuse block normally goes beside the battery instead of on the back fender like the original, now I've tucked it under the seat. In case anyone laters wonders the same thing, here's some info. Wiring it up isn't too difficult if you have both diagrams and some patience. In order to connect without cutting any connectors off I had to make a couple of jumper wires with bullet connectors for ground/kill switch/coil output. My 31k flywheel has an H shape timing mark, when I measured 2mm BTDC I found the 'lead' line of the H was very close to that, just a hair advanced. Strobing shows that at idle the spark is a hair retarded compared to the 4LO system, and revving it shows the spark advancing. This is exactly what I was hoping for based on 31k spark advance curve information I have read, so I tried a quick zip down the driveway.

Instead of running flat out terrible, it ran merely poorly! Headed in the right direction. Before it just hit a wall, and simply would not go over a certain RPM or throttle position, I could never quite tell which was the limit. On this first run it had a bog/stumble off the line but it tries to go and can get through the other side. I still had the carb settings a bit all over the place from the experimenting I had been doing so I set them back to stock specs that I've tried a thousand times, and this time it worked! Haven't had a chance to get a real run on the bike since it's not plated, but it's showing promise. I've tidied up all the little bits and I'm just waiting for some new bulbs and it should be ready for a real test run!.
I am aware that I am playing with fire leaving my crank seal leaking, but I am certainly not pushing it hard and I am monitoring mixture very closely as I work through this. I plan to monitor and run it easy for a bit and then do another leak down test in the hopes some running might have helped it seal as tacky1 mentioned.

I'm not gonna lie, the seemingly endless work on this bike is getting a bit old and the new Husky Svartpilen 401 is calling my name. Having to dig into this engine's bottom end yet again might be a tipping point. 
1982 RD350LC
2018 Husqvarna Svartpilen 401

RZ350Street
Posts: 209
Joined: Sat Jun 27, 2009 10:49 pm
Location: Winnipeg, Manitoba

Re: 4L0 vs 31K Stator/Rotor/CDI

#22 Post by RZ350Street » Thu May 28, 2020 8:17 pm

Alright!

Hit the powerband for the first time today since rebuild and it launched! Still some fine-tuning to do, but at least I know she will do it.

Mains are 220 stock, those wouldn't rev past 5k. Put in 240s just to make sure I was playing on the safe side and it got even worse. I tried the 200's that were in it when I bought it and they turned it into a rocket ship. I only did a very brief WOT run and I think the plugs look a little lean. Going to source some 210's and give it another go.
1982 RD350LC
2018 Husqvarna Svartpilen 401

User avatar
OldTZracer
Posts: 240
Joined: Thu Aug 05, 2010 2:21 am
Location: Alberta Canada

Re: 4L0 vs 31K Stator/Rotor/CDI

#23 Post by OldTZracer » Fri May 29, 2020 1:47 am

Great! Are you still using the YPVS ignition?
Curious that you're seeing such a difference between the 200s & 220s...
"...its a 2-stroke ya twit - Its supposed to smoke..."

RZ350Street
Posts: 209
Joined: Sat Jun 27, 2009 10:49 pm
Location: Winnipeg, Manitoba

Re: 4L0 vs 31K Stator/Rotor/CDI

#24 Post by RZ350Street » Sun May 31, 2020 10:39 pm

Some great news on this front!

Yes, OldTZracer, still using YPVS ignition. The more aggressive advance curve should be good for it, unless anyone thinks it's too much for the old LC? Here's the difference in curves.
http://dragondungbar.tripod.com/RD350LC ... _Curve.jpghttp://dragondungbar.tripod.com/RZ350_i ... _curve.JPG

I was really stuck at that 5k problem and what finally tweaked me on the right course is that it was RPM dependent, not throttle position. That meant it had to be a resonance thing so I went through and examined every piece along the intake tract and returned it to stock to eliminate variables. The exhaust was a set of microns that somebody had modified to fit and the final straw was finding this curve. It's on a 250, but the microns struggle around 5k http://www.alonzecustom.co.uk/resources ... 1%2045.jpg. I believe the air charge is bouncing back when the reeds close, going back through the carb and grabbing fuel a 2nd time, then when the reed opens it is racing fowards again, picking up fuel a third time. The 200 mains were necessary in order for this 'triple charged' area not to be too rich for the engine to break past this resonance band, but then they were dangerously lean up top.

This afternoon I rigged the stock exhausts back on again and whaddya know, it goes pretty good! The stumble at 5k is just a brief soft spot before it carries on strong, definitely something I can live with. Also, I'm back to the 220 mains and I feel much better about my odds of not melting a piston again. Further jetting checks to be done still but it seems good so far.

Finally, the best bit of news is that while I was checking things I decided to do another pressure test. She's sealed up tight! Held 6psi for 6 minutes without the slightest dip of the needle. Tested from both left and right sides, no difference. I am absolutely thrilled! I did not check vacuum John, I tried with the princess auto vacuum pump I have but the pump itself is unable to hold a negative pressure even with just my thumb over the end of the hose.

Finally, my one concern is that with the stock exhausts being much quieter than the crackle and pop of the microns I notice more engine noise than I expect. Sitting idle in neutral (so it's nothing in gearbox) you can hear the inner workings. I've never noticed this before. Is it perhaps fresh rings on fresh cylinders just getting comfortable together or are these known to be noisy engines, or should I be very concerned? It's not crazy, but it's just something I hadn't noticed before.

Kevin
1982 RD350LC
2018 Husqvarna Svartpilen 401

User avatar
L.B
Posts: 2008
Joined: Sat Aug 13, 2011 9:59 am
Location: Hunter Valley,Australia
Contact:

Re: 4L0 vs 31K Stator/Rotor/CDI

#25 Post by L.B » Fri Jun 05, 2020 8:50 pm

Great news on going in the right direction.
I was going to ask if you'd put some sealant on the output keyway as well as can leak here sometimes too.
Also you can split the case halves without removing cylinders etc. Id post pics but dont know how to....anyway i learnt that trick off Sliverstrom ages ago. :smt023

User avatar
OldTZracer
Posts: 240
Joined: Thu Aug 05, 2010 2:21 am
Location: Alberta Canada

Re: 4L0 vs 31K Stator/Rotor/CDI

#26 Post by OldTZracer » Wed Jun 10, 2020 3:09 am

That's great that you are getting it sorted out - & learning more than you ever wanted to know about stand-off & expansion chamber design...
"...its a 2-stroke ya twit - Its supposed to smoke..."

Post Reply